Via Receipts in the navigation bar, you can see all receipts of the chosen day. The list is on the left, and the selected receipt is on the right. For each receipt, you see straight away whether it is paid or unpaid. Pro forma receipts are marked separately, and you can switch between VAT receipts and kitchen receipts. Use the date bar to browse through past days.

Refunding a receipt#
Did you ring up a receipt wrongly, or is a customer coming back? Open the receipt and start a refund. For each product, you choose how many items you refund: both full and partial refunds are possible. The refund is a counter-entry with its own trail in your reports: the original receipt stays in place, and on a GKS the refund is also fiscally signed. See also the frequently asked questions about adjusting reports.
Correcting the payment method#
Did you take payment as cash when it was Bancontact? Correct the payment method from the receipt: you choose the payment method the receipt should have been booked under. Only the registration of the payment changes, not the amount, and this correction also gets its own trail.
Reprint#
Does a customer ask for a receipt later? Reprint it from the receipt details. On a GKS, such a reprint is neatly registered as a copy.
Warning
If a receipt was already refunded on another device, the POS notices this and prevents a double refund.
Creating an invoice annex for a tab#
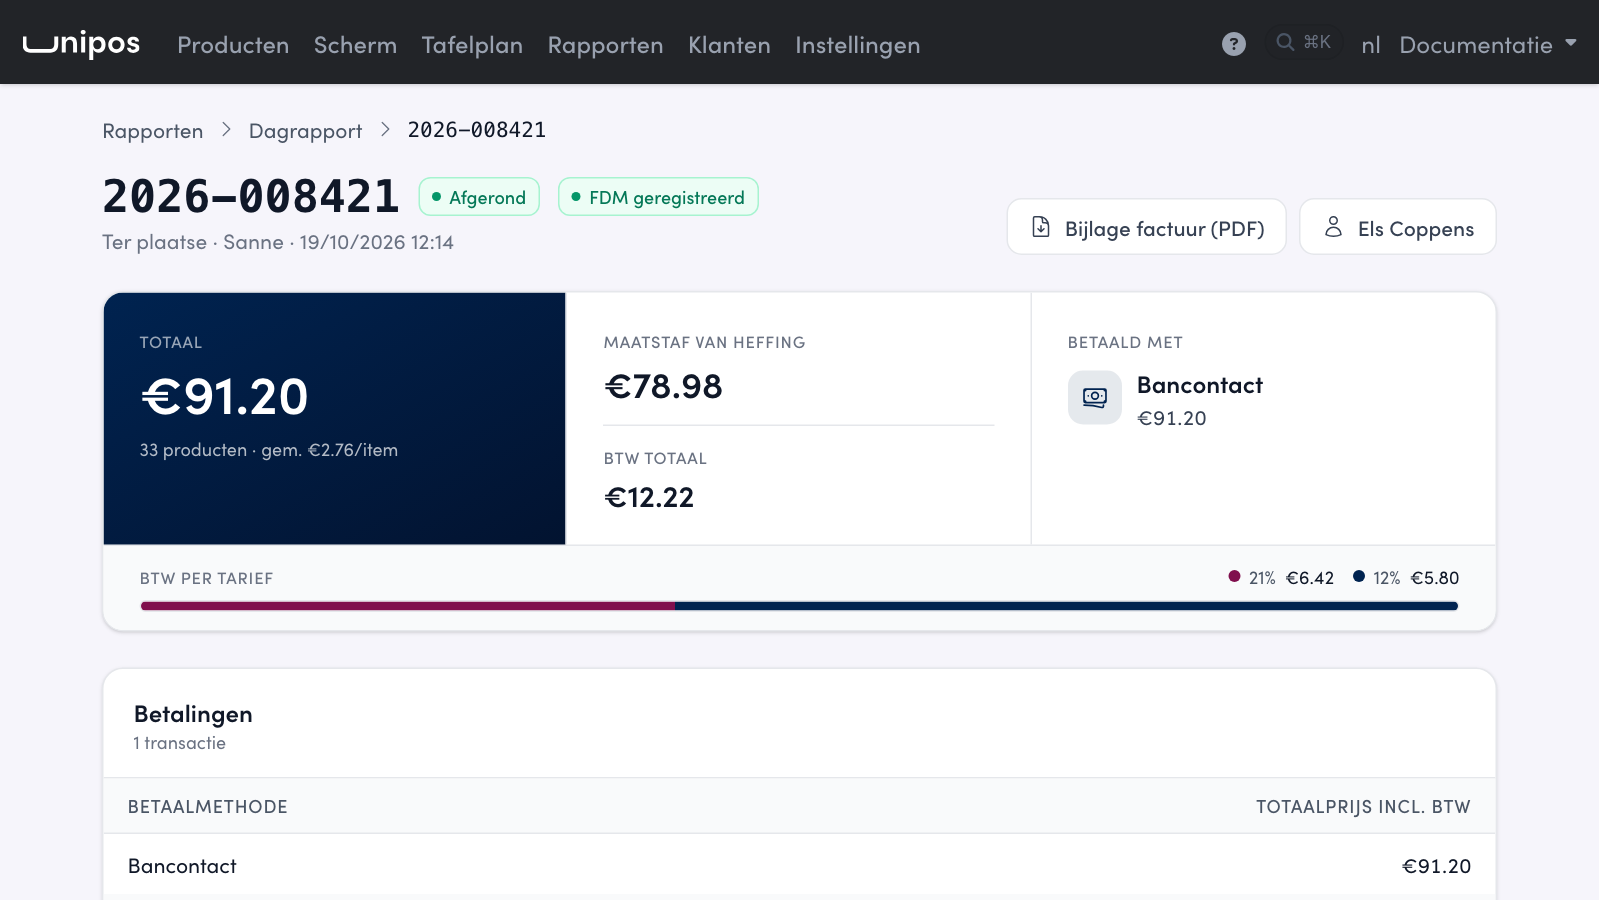
A company that eats on account gets one invoice. With Bijlage factuur (PDF) (invoice annex) you pull a sheet from a receipt to attach to that invoice: per day what was consumed, with your own details and your customer's. That way your customer can check the invoice without you forwarding every receipt separately.
Open the receipt in the back office, via Reports, Day report or via the customer's sheet.
Click Bijlage factuur (PDF) at the top right.
The PDF downloads, with the receipt number and the day of payment in the file name.
What is on it#
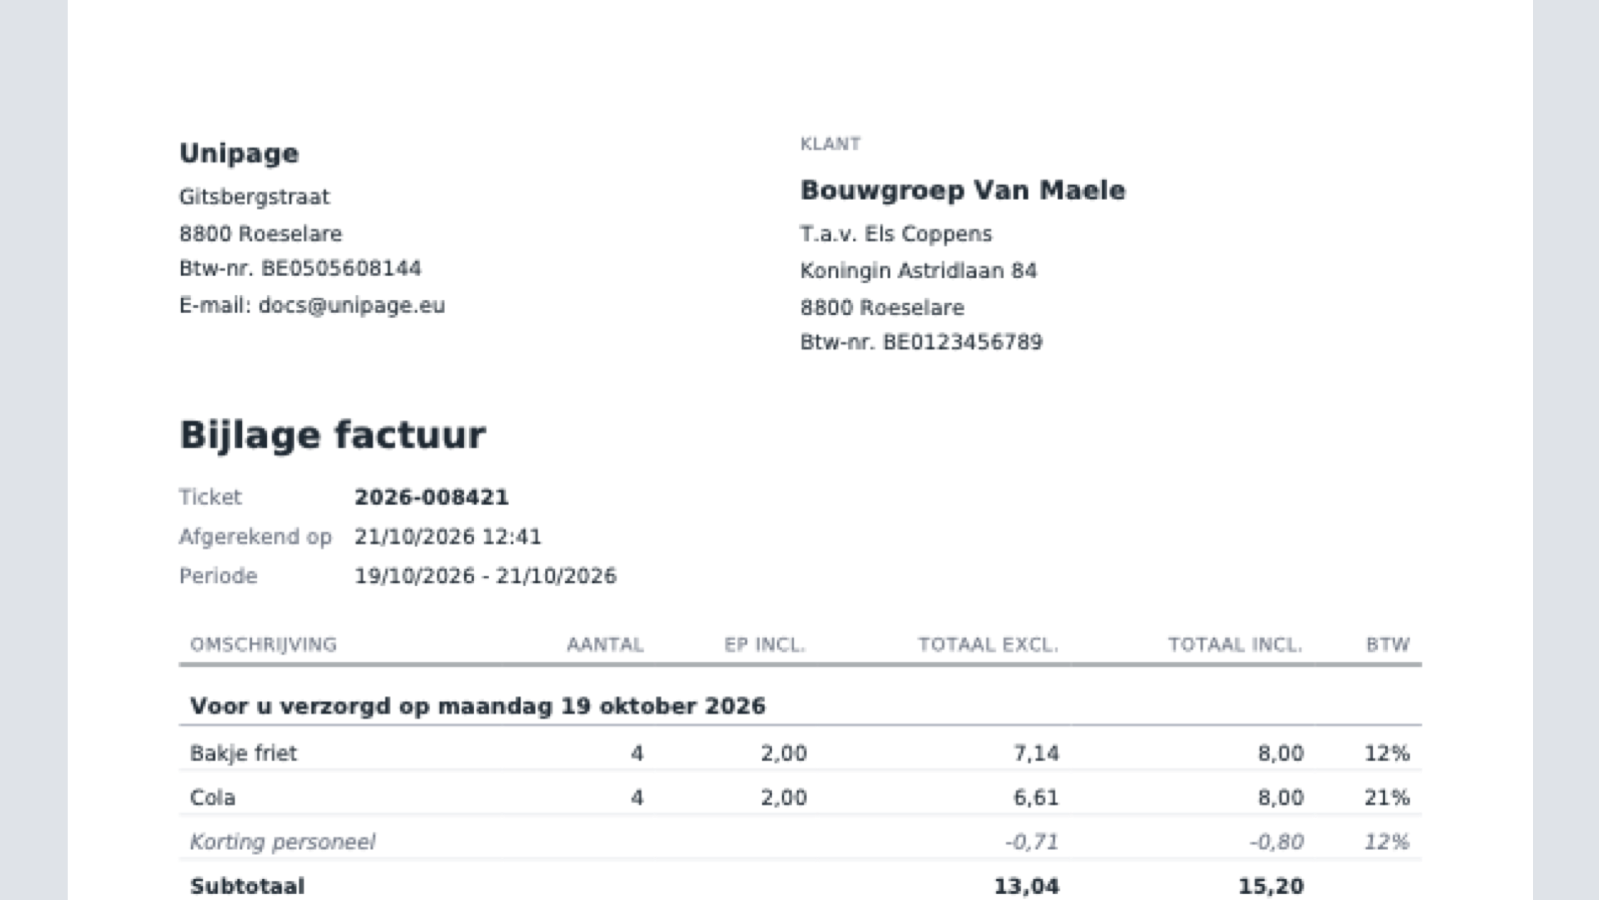
Top left your own company: name, address, VAT number and e-mail address.
Top right the customer linked to the receipt, with Attn. and the name of the contact person, the address and the VAT number. If no customer is linked to the receipt, that block stays empty.
Per day a line Served on with the date, the products of that day and a Subtotal. Identical products of the same day sit on one line, with the total quantity. Discounts are listed below in italics, with a minus sign.
At the bottom the VAT per rate and the total of the whole tab.
Unit incl. is the unit price including VAT, Total excl. and Total incl. are the amounts of the whole line.
A tab spanning several days#
Every line sits on the day it was ordered. If the tab stayed open for three days, you see three days each with their subtotal, and at the top under Period from which day to which day the tab runs.
Good to know
The annex is an overview you attach to your own invoice, not a VAT receipt. You send the VAT receipt separately, as explained under Digital VAT receipt.
The digital VAT receipt of a receipt#
Did your customer get the VAT receipt by email instead of on paper? Then that VAT receipt stays with the receipt in the back office. You see the VAT receipt as it was issued, open the page your customer got and send the VAT receipt again. This applies to VAT receipts from the POS and from webshop orders. How your POS issues a VAT receipt digitally is explained under Digital VAT receipt.
Where to find it#
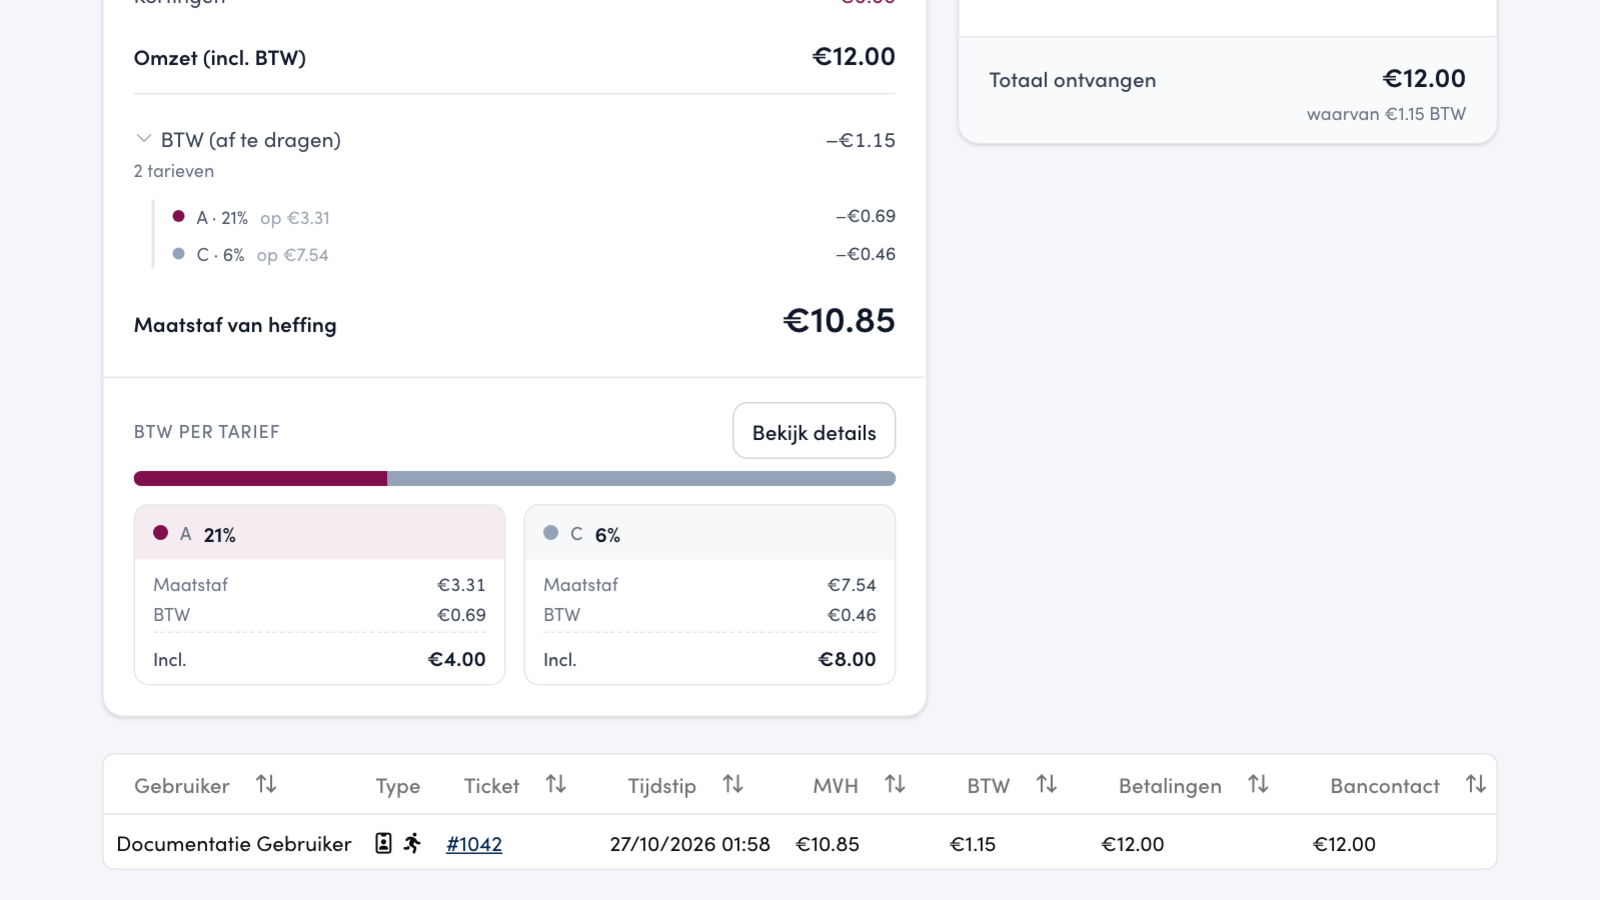
Open the receipt in the back office, via Reports, Day report or via the customer's sheet.
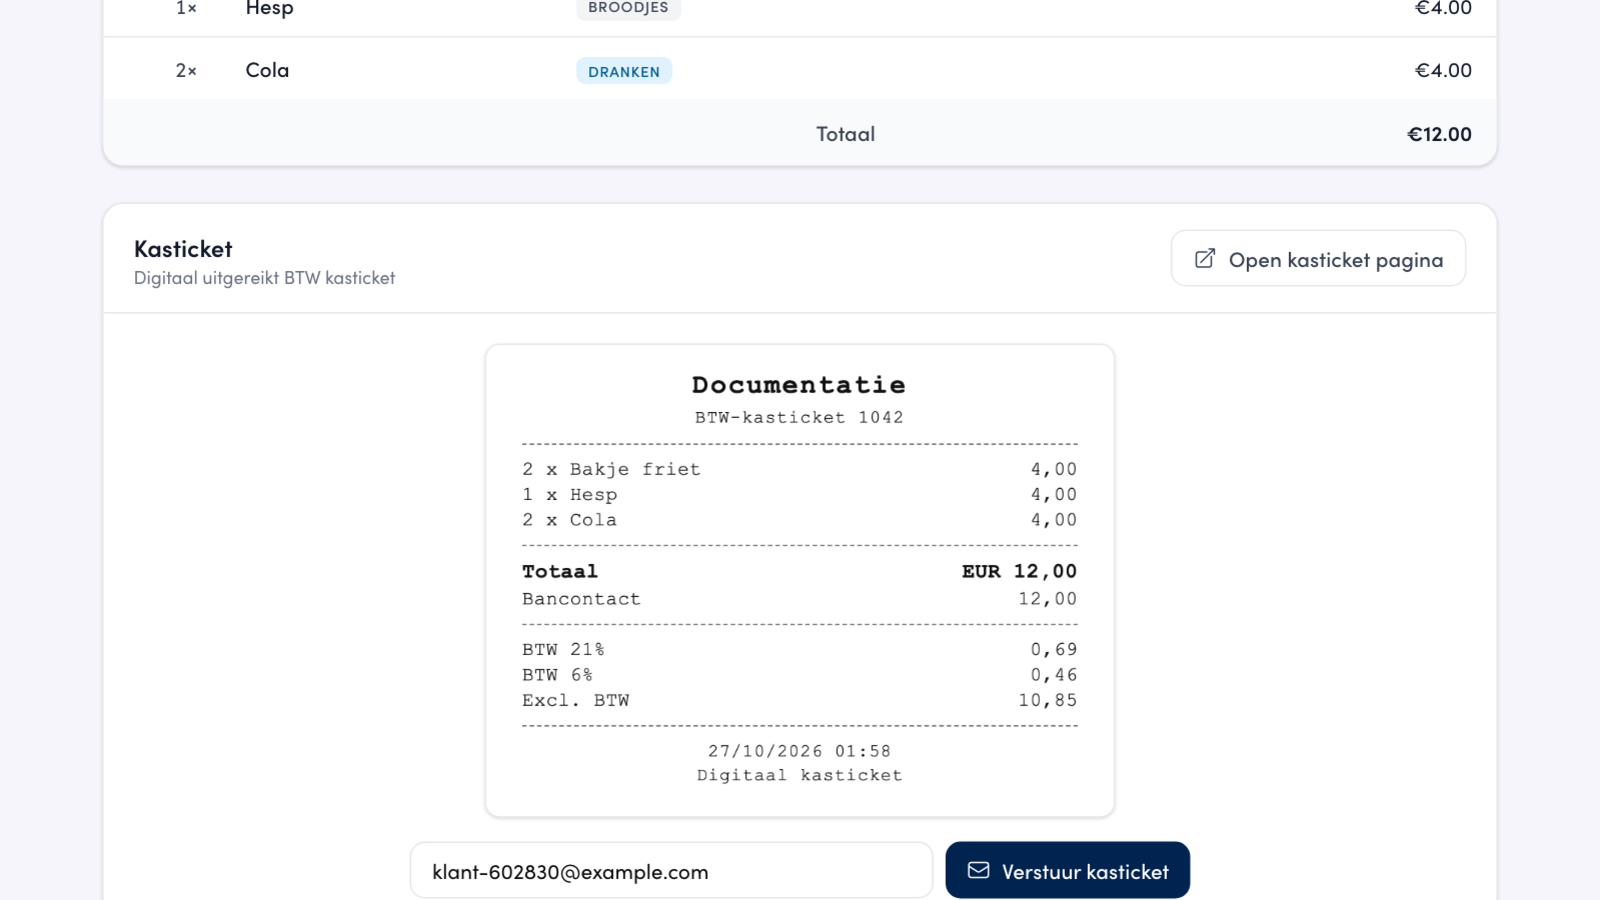
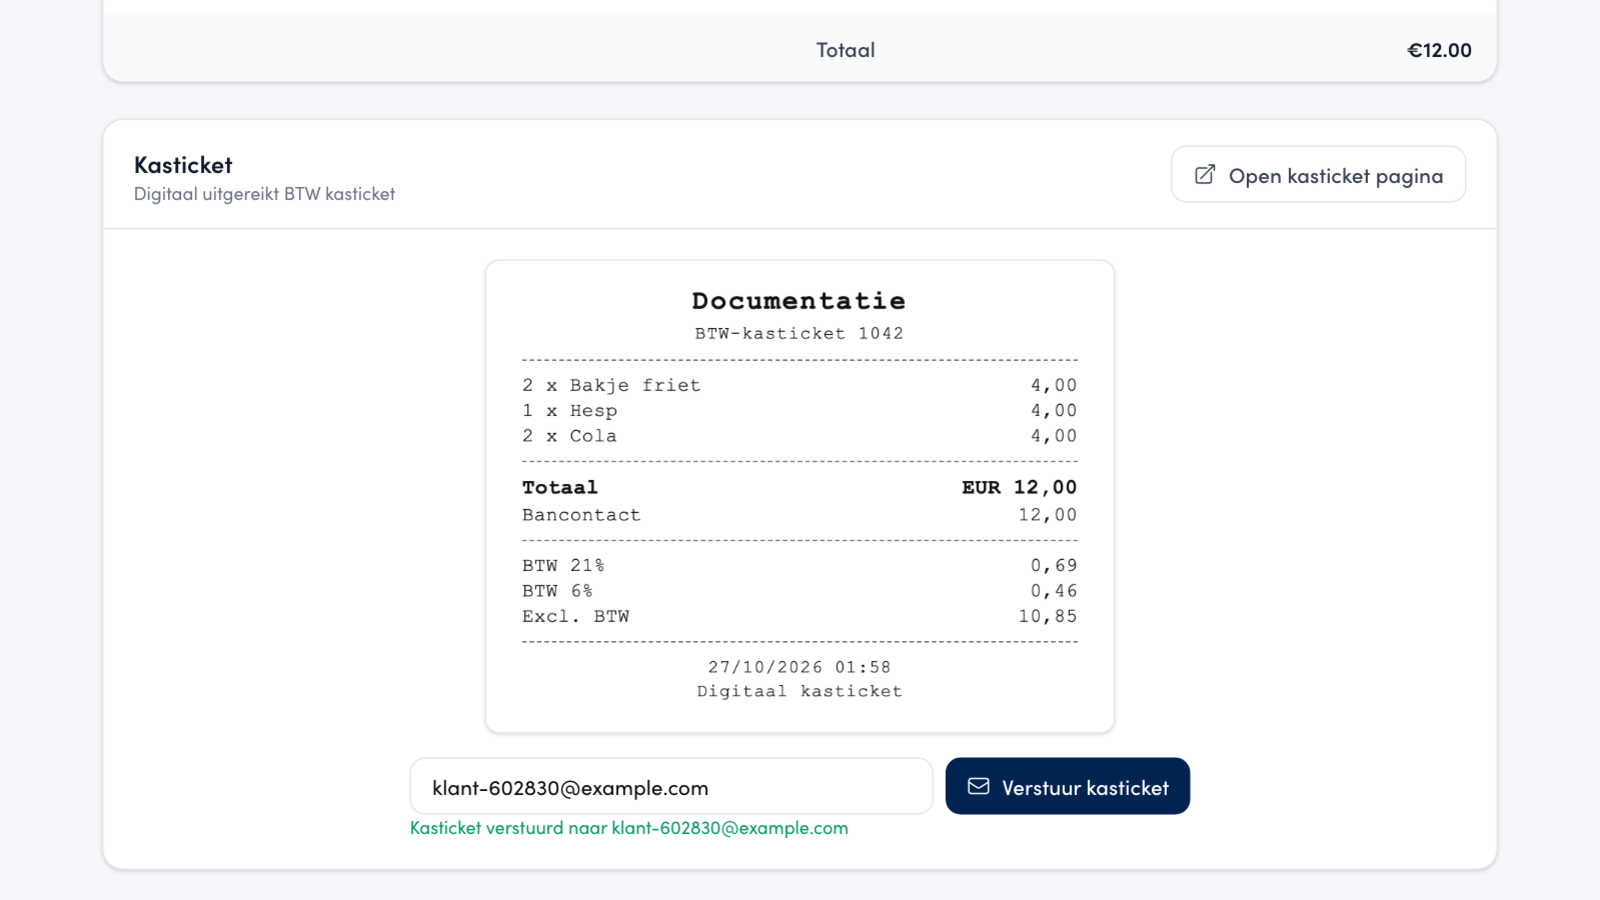
Scroll down. Below the lines of the receipt is the Receipt card, with VAT receipt issued digitally underneath and the image of the VAT receipt.
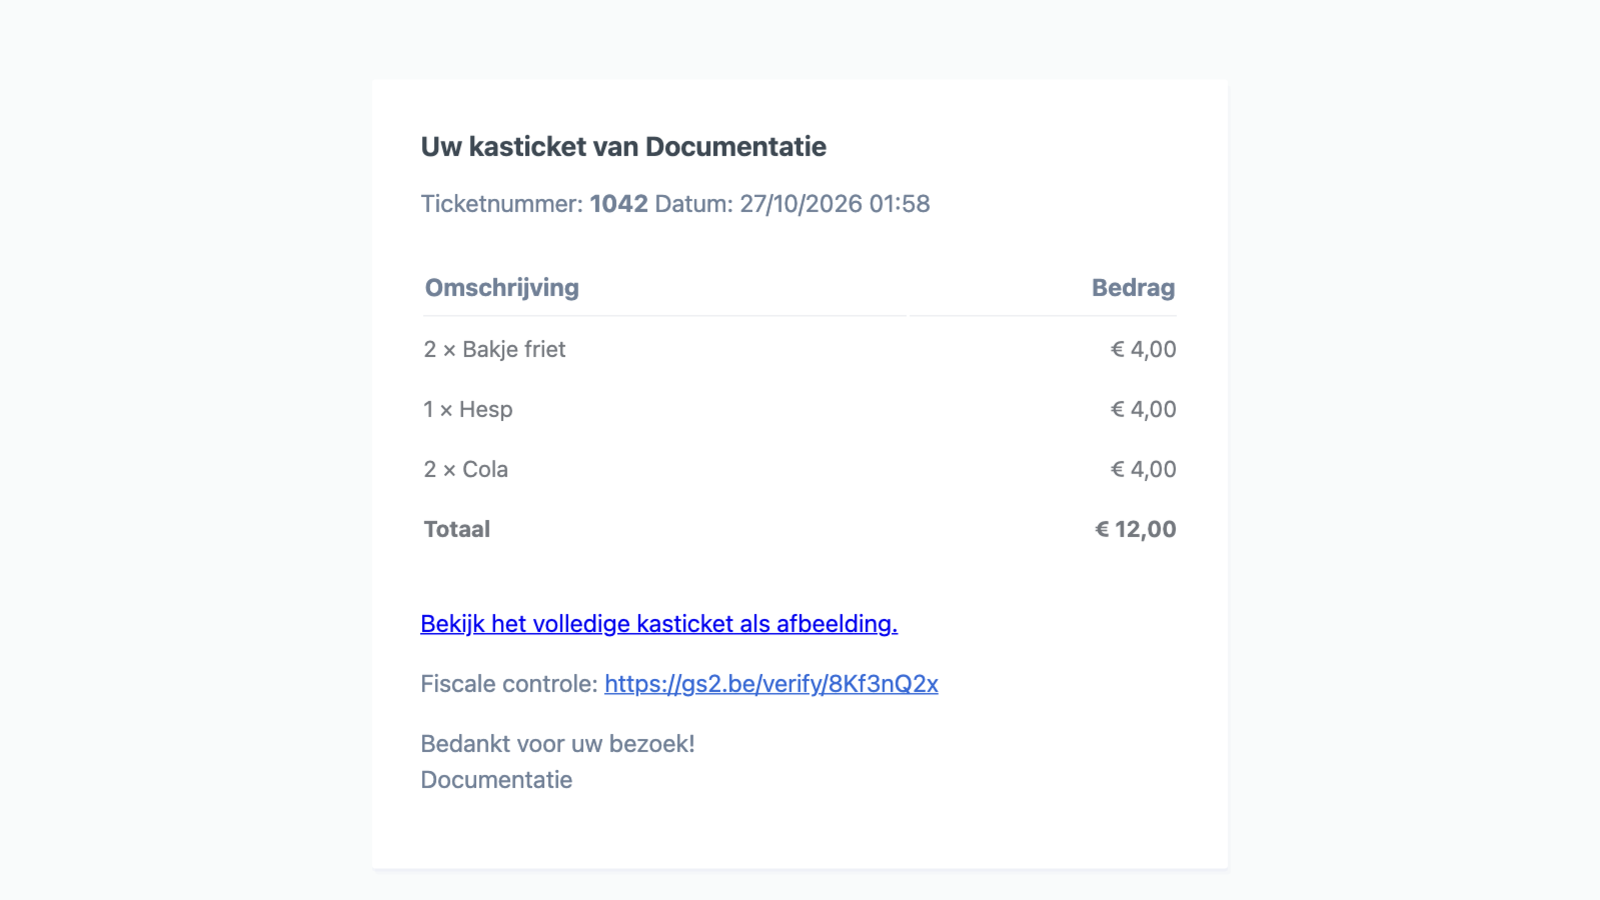
Click Open the receipt page to open the page your customer got in the email: the lines, the total, the VAT receipt as an image and the fiscal verification link.
Sending it again#
Below the image, enter the address under Email address and click Send receipt. If a customer is linked to the receipt, their address is already filled in. You can also enter another address. The recipient gets the same email as at the sale, with the VAT receipt attached. Afterwards it says Receipt sent to with the address. If you see Sending failed, please try again, try again. If it keeps failing, contact support.
Good to know
No Receipt card? Then the VAT receipt was printed on paper. Only a VAT receipt the POS issued digitally is shown with the receipt. Unipage keeps that image, even when the email is already gone from your customer's inbox.
Warning
If the receipt is archived, you still see the VAT receipt, but you can no longer send it again.
Your trading name on your receipts#
Your receipt shows your company name, your address and your VAT number. With a trading name you put the name your customers know on a line of its own, right above your company name. This applies to your POS receipt and to the receipt you print from the order app for a webshop order.
On the management page, go to Settings and choose Information.
Under Commercial name, enter the name your customers know. In the example the company name is Unipage BV and the trading name Unipage.
Click Save.

Leave your company name as it is: it always stays on the receipt. If you leave the trading name empty, or it is the same as your company name, no extra line is added.
Good to know
Don't see the trading name on your receipt? Check in Cash register configuration, on the Templates tab, whether the Company information block is in your receipt template. Working without Unipos PLUS? Then that block is under Settings, Printer.
Receipts not visible in the cloud#
Can't see a sale in the management page or in your reports? Usually the POS didn't reach the cloud. Fix the internet problem and send the receipts again.
The POS first saves every sale on the terminal, then sends it to the cloud. If the internet drops or sending fails, the receipts stay on the terminal. You don't lose any sales, but you only see them in the management page and in your reports once they reach the cloud.
How to spot it#
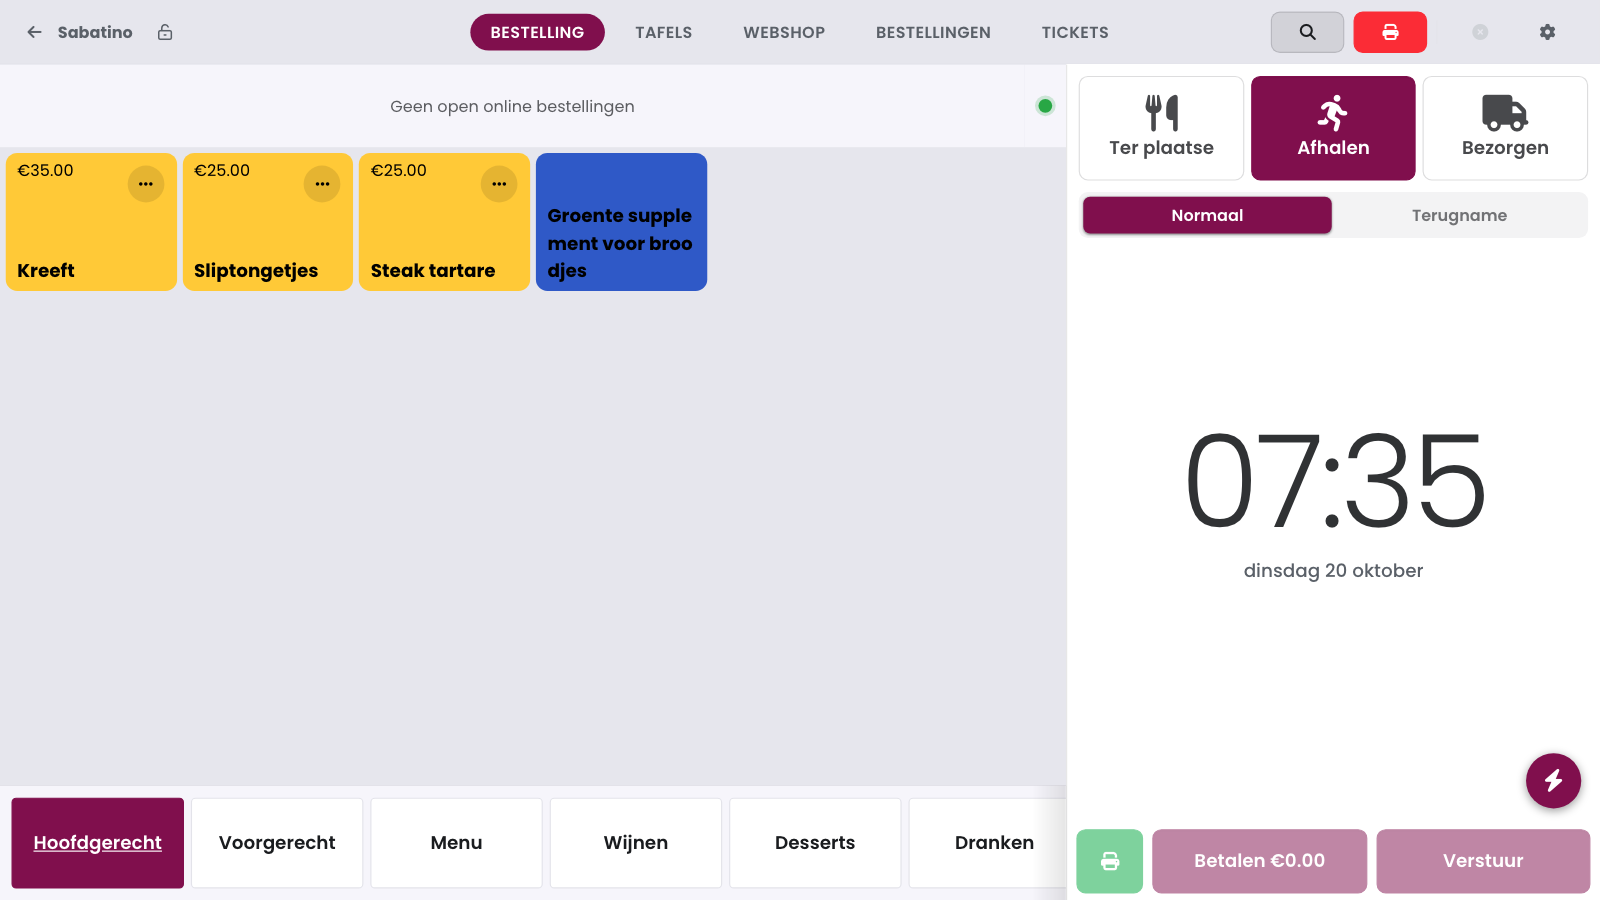
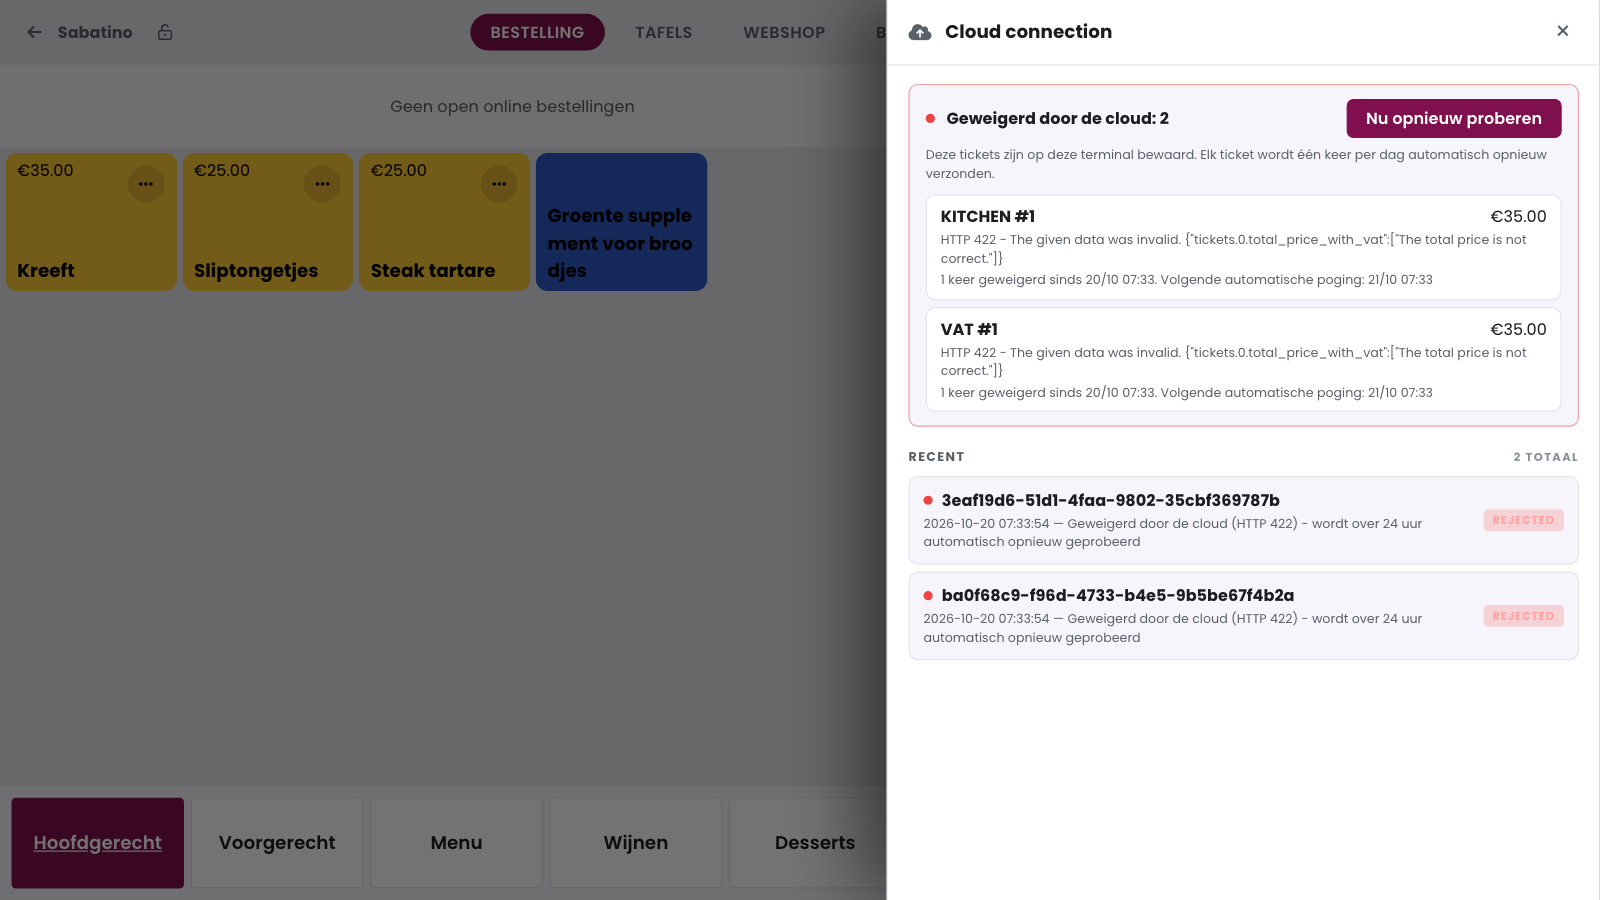
Is there a cross on the cloud button at the top right of the POS? Then the POS didn't reach the cloud. Tap the cloud button: the sidebar shows which receipts are not in the cloud yet.
Tickets to sync: receipts that are still waiting to be sent.
Refused by the cloud: receipts that failed to send. For each receipt, you see the type, the number, the amount, the message and when the next automatic attempt will happen.
How to fix it#
Check the internet connection of the POS: is the wifi on, is the network cable plugged in properly, is your router working? The network check in Health shows whether the POS has a connection.
Tap the cloud button.
Tap Retry now for refused receipts, or Sync all for receipts that are still waiting.
If it works, you see Everything synced and the receipts appear in the management page.
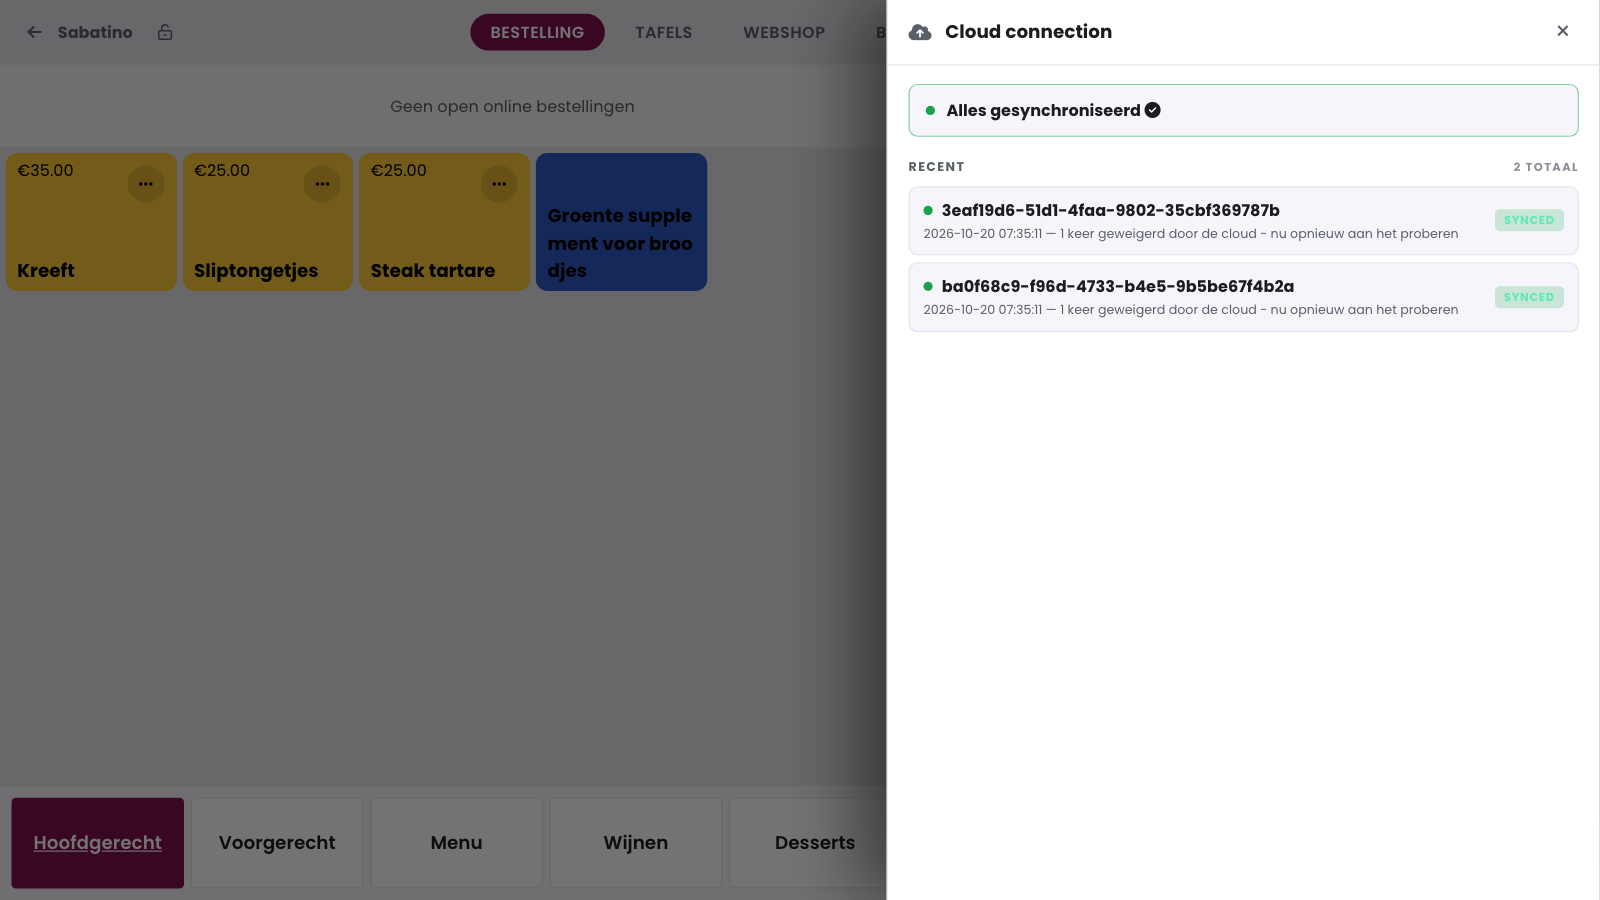
Good to know
The receipts stay saved on this terminal, even if you restart the POS. If you don't tap retry, the POS automatically sends a refused receipt again once a day.
It keeps failing#
If the internet works and a receipt stays refused, the cause is in the receipt data. Note the HTTP status and the message from the sidebar and contact support.
Frequently asked questions
Do I lose a sale if the POS has no internet?
No. The receipt stays saved on the terminal until it reaches the cloud. Only then do you see it in the management page and in your reports.
Why is there a cross on the cloud button?
The POS didn't reach the cloud. Tap the button to see which receipts they are and what went wrong.
I tapped Retry now, but the receipt is still there.
First check the internet connection and try again. If the receipt is still there, note the message from the sidebar and contact support.
Why is everything on the tab listed under one day?
Then the POS sends no time with the lines of that receipt, for example because the receipt comes from an older version of Unipos PLUS. The annex then puts them on the day of the receipt. If you see this on new receipts too, update Unipos PLUS, see Updating Unipos PLUS.
Why is there no customer on the annex?
No customer is linked to the receipt. Link the customer to the sale and they appear with their company, address and VAT number at the top right. How to link a customer is explained under Customers.
Does my customer get the annex automatically?
No. You download the PDF yourself and attach it to the invoice you send. Nothing is e-mailed automatically.
Does my customer get a different VAT receipt when I send it again?
No. You send the same image of the issued VAT receipt, with the same verification data. Only the email is new.
Does this also apply to the VAT receipt of a webshop order?
Yes. If your POS emails the VAT receipt of a webshop order, that VAT receipt is also shown with the receipt in the back office. How to set that up is explained under Digital VAT receipt.