Follow your incoming orders on a tablet or smartphone in your business: new orders arrive in the queue, you work through them step by step, and your receipts print automatically.
 The app runs in the browser,
no installation needed
Opening the app#
Switch on Gebruik de bestel app (Use the order app) under Order settings, then open the app on the device in your business. On the home screen of the management page you will find the Open app button under Quick actions (Snelle acties). The app simply works in the browser: no installation needed.

Following orders#
New orders appear in the queue (wachtrij). Mark an order as started (begonnen) as soon as you start working on it, and as done (afgewerkt) once it is ready. You can also move it back to the queue, and with Bulk you process several orders at once.
For each order you immediately see the chosen time, the comments, any tip and the payment status: paid online, cash, or not yet paid. Kiosk and in-house orders are marked separately.
Getting too busy? With Bestellingen uitschakelen (Disable orders) you pause new orders until midnight.
Postponing an order#
Is the kitchen filling up and an order comes in too early? Open the order and postpone it by +15, +30 or +45 minutes. The card then shows how many minutes the order has been postponed, so the whole team can see it. You can postpone an order once.
Your customer does not get an automatic message about the postponement: let them know yourself when needed.
When does your customer get a message?#
As soon as you mark an order as started, a message is automatically sent to your customer: the team has started, and the order will be ready in about this many minutes. This estimate is your general preparation time plus the longest deviating preparation time in the order. For delivery to an address, the estimated driving time is added.
The message is only sent when Schakel communicatie in voor de consument (Enable communication for the consumer) is switched on in the Emails tab, see Communication with your customer.
Your customer gets an e-mail, and also an SMS when SMS is active for your business and a phone number is known.
Is the estimated time structurally off? Adjust it via the preparation time, or via a deviating preparation time on the product page.
Printing receipts#
The first time you start, the app asks how your printer is connected:
USB printer: the printer is connected to this device with a cable. Click Verbind USB printer (Connect USB printer) and choose your printer in the browser window.
Network printer: the printer is on the same wifi network. Enter the IP Adres printer (Printer IP address). You can find it on the test receipt that the printer prints when it starts up.
Under Printer in the app settings, you can change this later with Printer opnieuw instellen (Reset printer). There you also choose which Printer from your management page this tablet uses (important if you hide products per printer, see below), the Aantal kopieën (Number of copies), and whether the app should do Automatisch printen (Automatic printing). If this is on, every new order prints straight away, as a Werkbon (Work order, without prices, for the kitchen) or as a Gewoon ticketje (Regular receipt, with prices, for the customer), your choice under Type ticketje voor automatisch printen (Receipt type for automatic printing). You can always print manually with Print ticket and Print werkbon on the order, or Print alle tickets and Print productielijst for a whole folder.
Good to know
Batch orders are never printed automatically. They collect in their own folder and you print them yourself per round, see Batch orders.
 The receipt is
fully customisable
Setting up printers on the management page#
You manage which printers there are and what appears on them under Settings, Configuration, Printer. This page appears as soon as the print module is switched on. You do this yourself under Settings, Professional with Printmodule activeren (Activate print module).
Adding a printer#
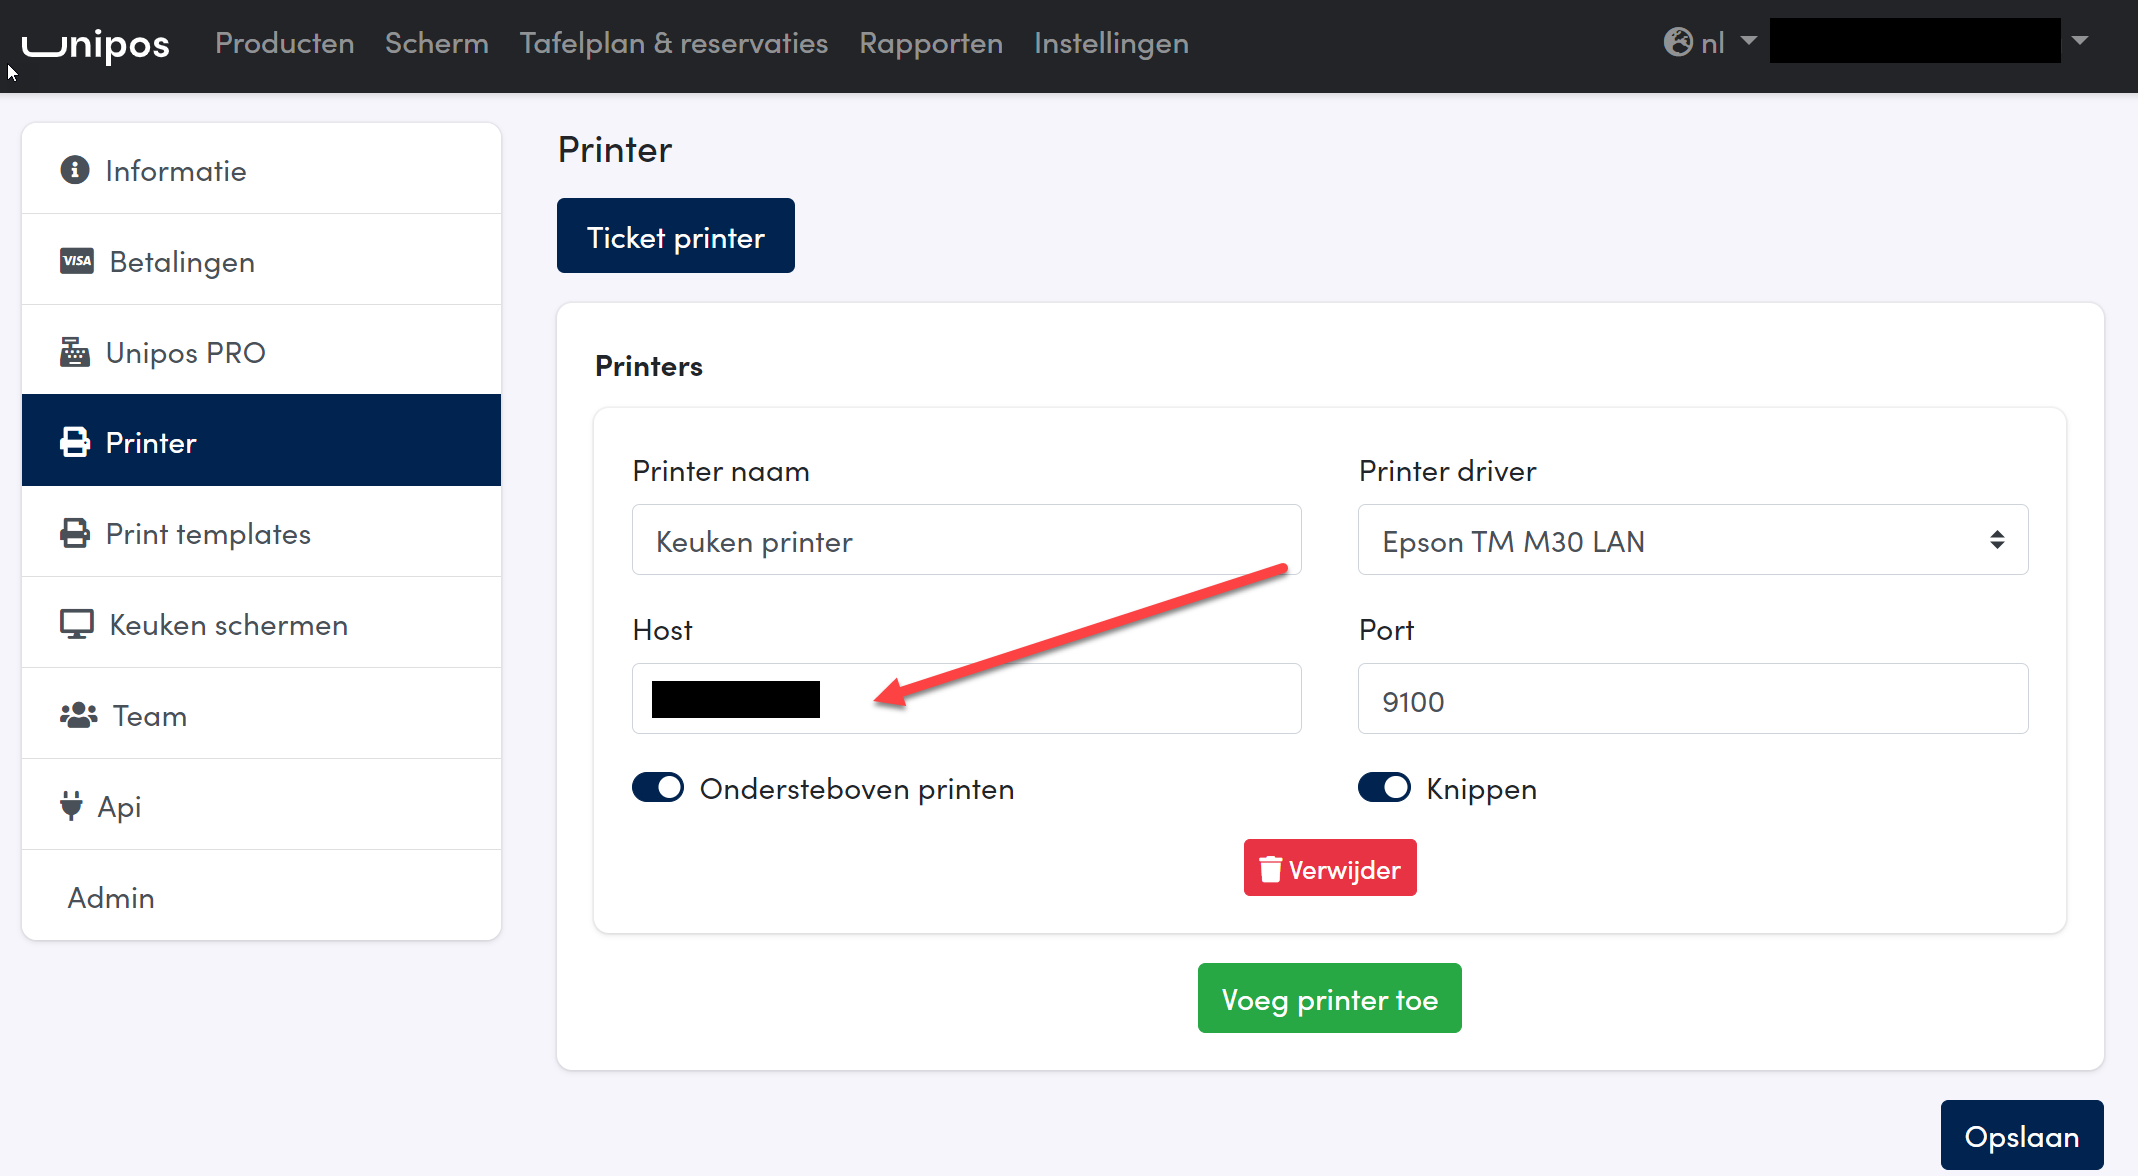
Click Voeg printer toe (Add printer). Enter a Printer naam (Printer name), for example "Kitchen printer" or "Bar printer", and choose the Printer driver that fits your device: there are drivers for Epson, Star and Duranmatic network printers, a generic ESC/POS driver for network and USB, and Zebra for label printers. For a network printer, enter the IP address under Host. Then click Save.
If you only have one printer, you are done. If you work with several printers, for example one in the kitchen and one at the bar, you use the Regels (Rules) to decide which orders go to which printer: per Bron (Source: Webshop, Kiosk, QR, POS), per Type (On site, Takeaway, Delivery) and per Betaling (Payment: Paid online, Paid at the POS). If you leave a row empty, there is no filter on that row. With Volgorde (Order) you indicate which printer takes priority if several printers have the same rules.
Products per printer#
Do you want the bar printer to print only the drinks and the kitchen printer only the dishes? Under the printer, click Verborgen producten (Hidden products) (or Ieder product is zichtbaar, Every product is visible). You get your product overview per category, where you choose per product or per category whether it is printed on this printer, with Alles printen (Print all) and Niets printen (Print nothing) as quick buttons. Save with Save. Hidden products only appear at the bottom of the receipt as a number, so the kitchen knows something still belongs at the bar.
Building your receipt#
Under Templates on the same page, you choose Gewoon ticket (Regular receipt) or Werkbon (Work order). On the left are the parts of the receipt, on the right is a sample receipt that changes immediately with every change.
With the switch next to a part, you turn it on or off.
With the handle on the left, you drag a part higher or lower on the receipt.
Click a part to set its details, usually the Text size and a few options.
You can use these parts:
Space for ticket holder: empty lines at the top, so the receipt fits in a ticket holder.
Company information: your logo, name, address and VAT number.
Type of order: Takeaway, Delivery or On site, large at the top.
Location, Tijd (Time, with or without date), Contact information (name, e-mail, phone), Payment method and Reference (the order number).
Order: the product lines. Here you choose, among other things, whether the prices are visible (Price visible, Price of variation visible), whether the products are Sorted by category with a line between them, whether identical lines are added together (Grouping identical product lines), whether variations are printed in bold, and the size of amount, product, variations, category and comment. With Setting background colour on products you print the product lines white on black, which stands out in a busy kitchen.
Free text: your own message, for example "Thank you for your order" or your opening hours, optionally white on black.
VAT Table: the VAT breakdown per rate, for those who use the receipt as proof of payment.
Google Maps QR code: for deliveries, a QR code that shows the courier the route straight away.
Source of order: whether the order comes from the webshop, the QR code, the POS or the kiosk.
Loyalty information and Moneytronic QR code: only useful if you work with loyalty points or a cash machine.
Don't forget to click Save. A work order starts by default without company information and without prices; a regular receipt with both.
Tip
For the kitchen, a large Text size for Type of order and Time, products sorted by category and variations in bold work best. Prices and company information are just noise there.
Nothing printing any more?#
At the top of the order app, just below the days, there is a bar with the Printer status and the number of Printopdrachten (Print jobs). The bar is green when the printer is connected and red when it is not. Click it to see the queue: a job that fails stays at the front until the printer responds again, and with Alle printopdrachten verwijderen (Delete all print jobs) you empty the queue. If you get an error message, check whether there is still paper in it, whether the printer cover is properly closed and whether the USB cable is firmly connected at both ends, and restart the printer. Then connect the printer again via Printer opnieuw instellen.
 Click the bar to fix the printer fault
Settings in the app#
Via Settings in the app itself, you can arrange two more handy things:
Tijdsloten beheren (Manage timeslots) opens the day overview of your timeslots, so you can block moments or adjust limits straight from the app. You can read how that works in Adjusting timeslots.
Bestellingen uitschakelen is your emergency button: one tap and no new webshop orders come in until midnight. Handy when the business suddenly fills up or the kitchen goes down.
Frequently asked questions
How do I connect a new Durapos printer?
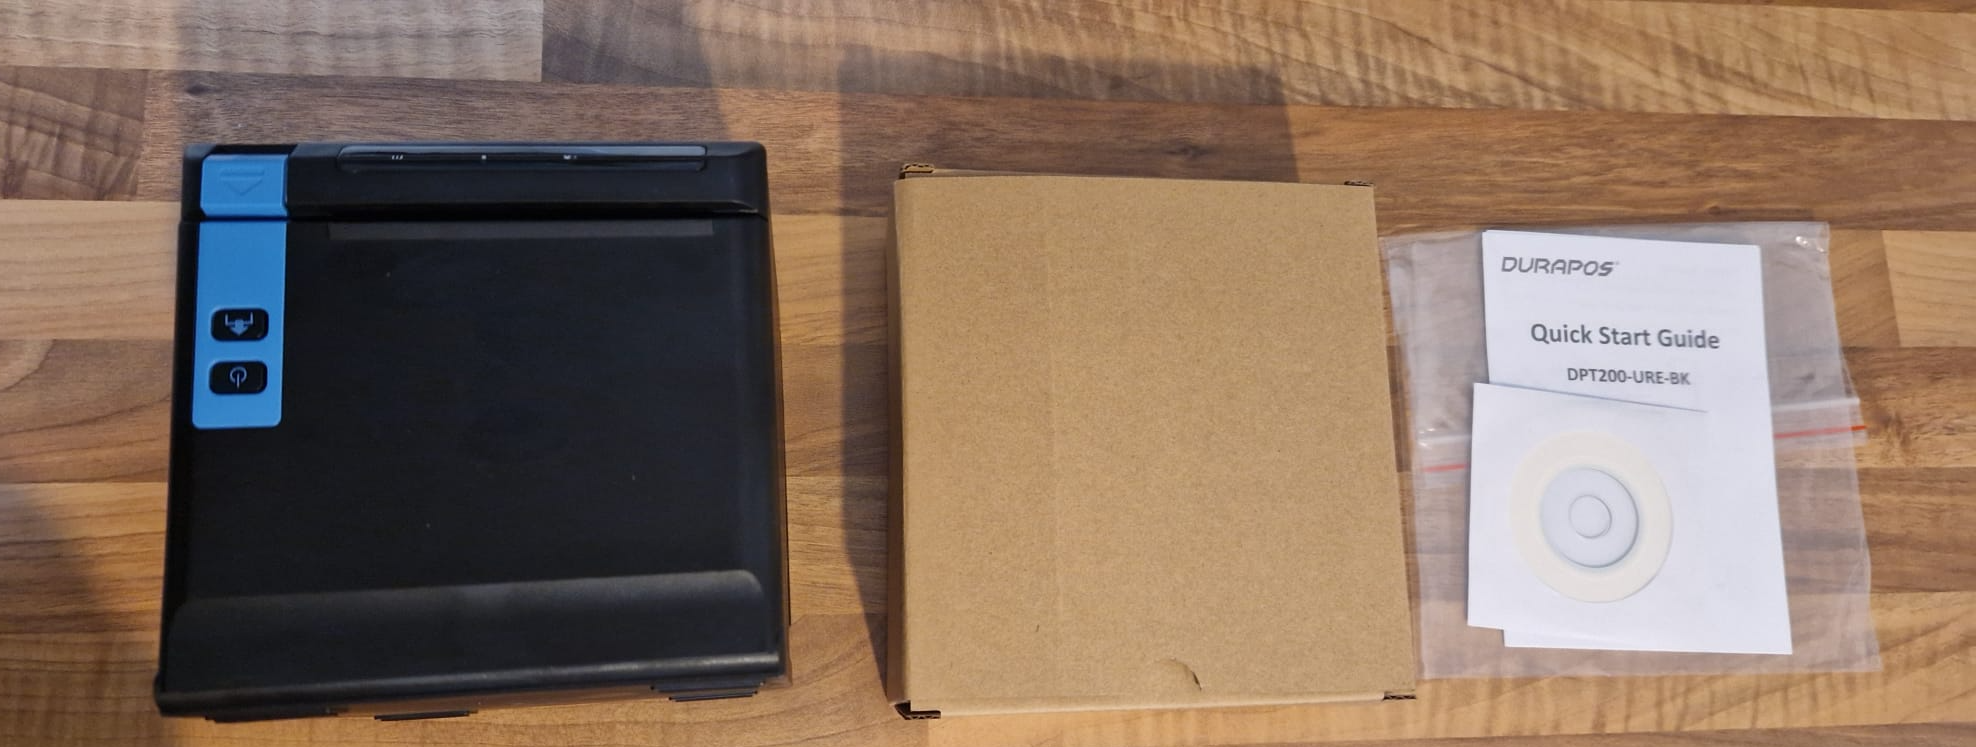
In the box you will find the printer itself, a box with cabling, and a quick start guide with a CD (you do not need it).
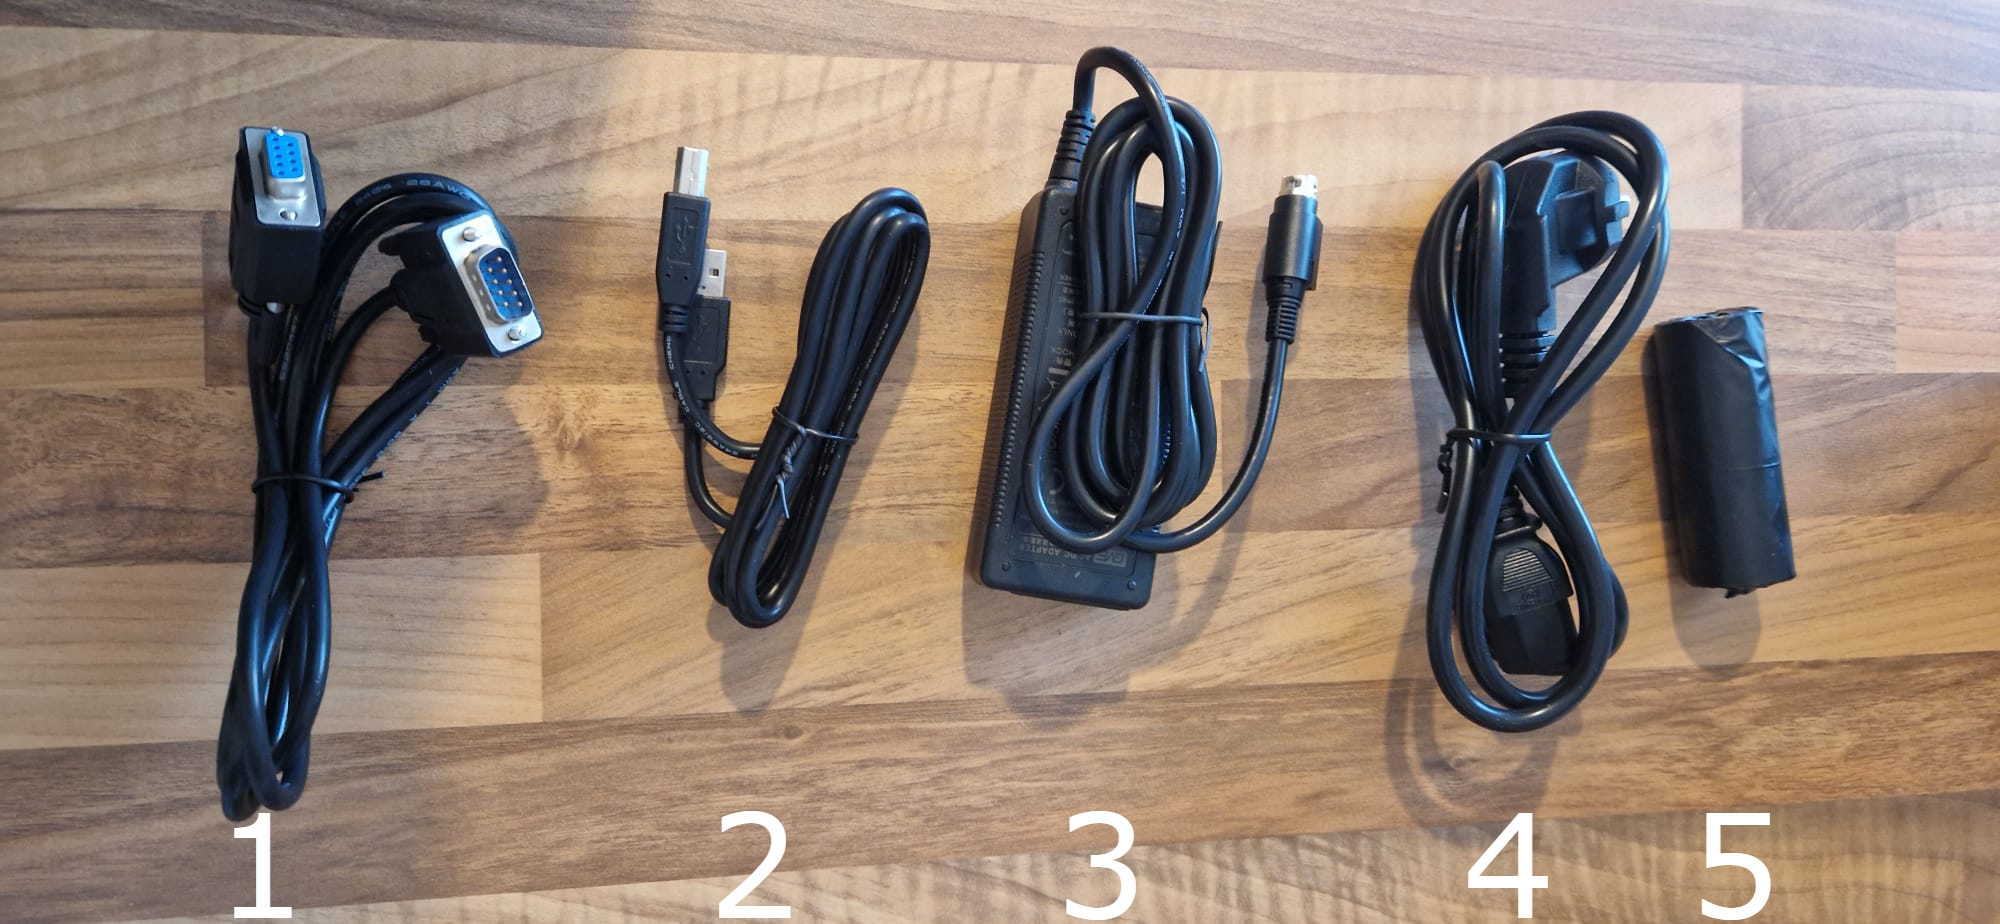
The box with cabling contains an RS232 cable (not needed), the USB-A to USB-B cable, the power adapter with power cable and a small roll of labels.
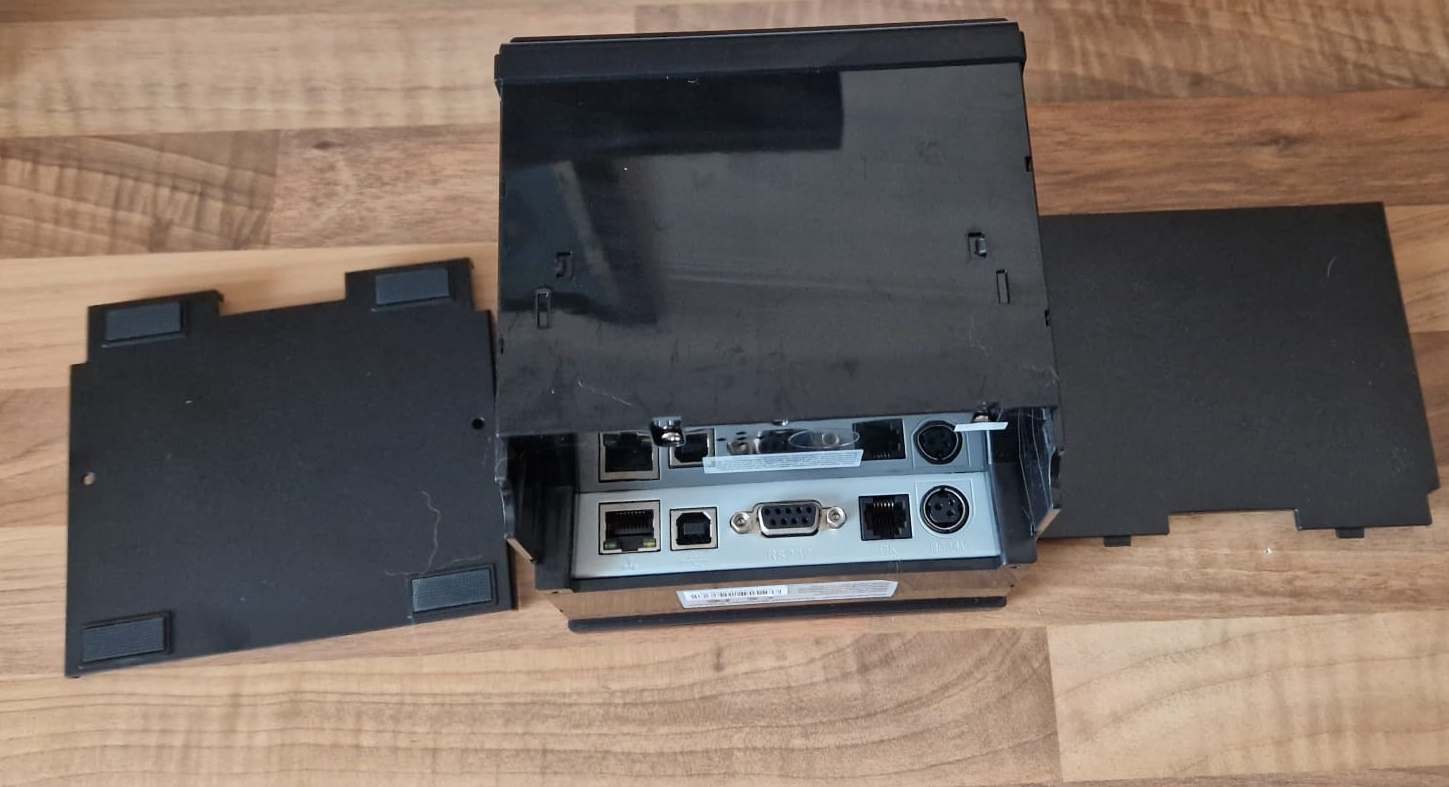
- Remove the back and the bottom of the printer. You can simply do this with your fingernail.
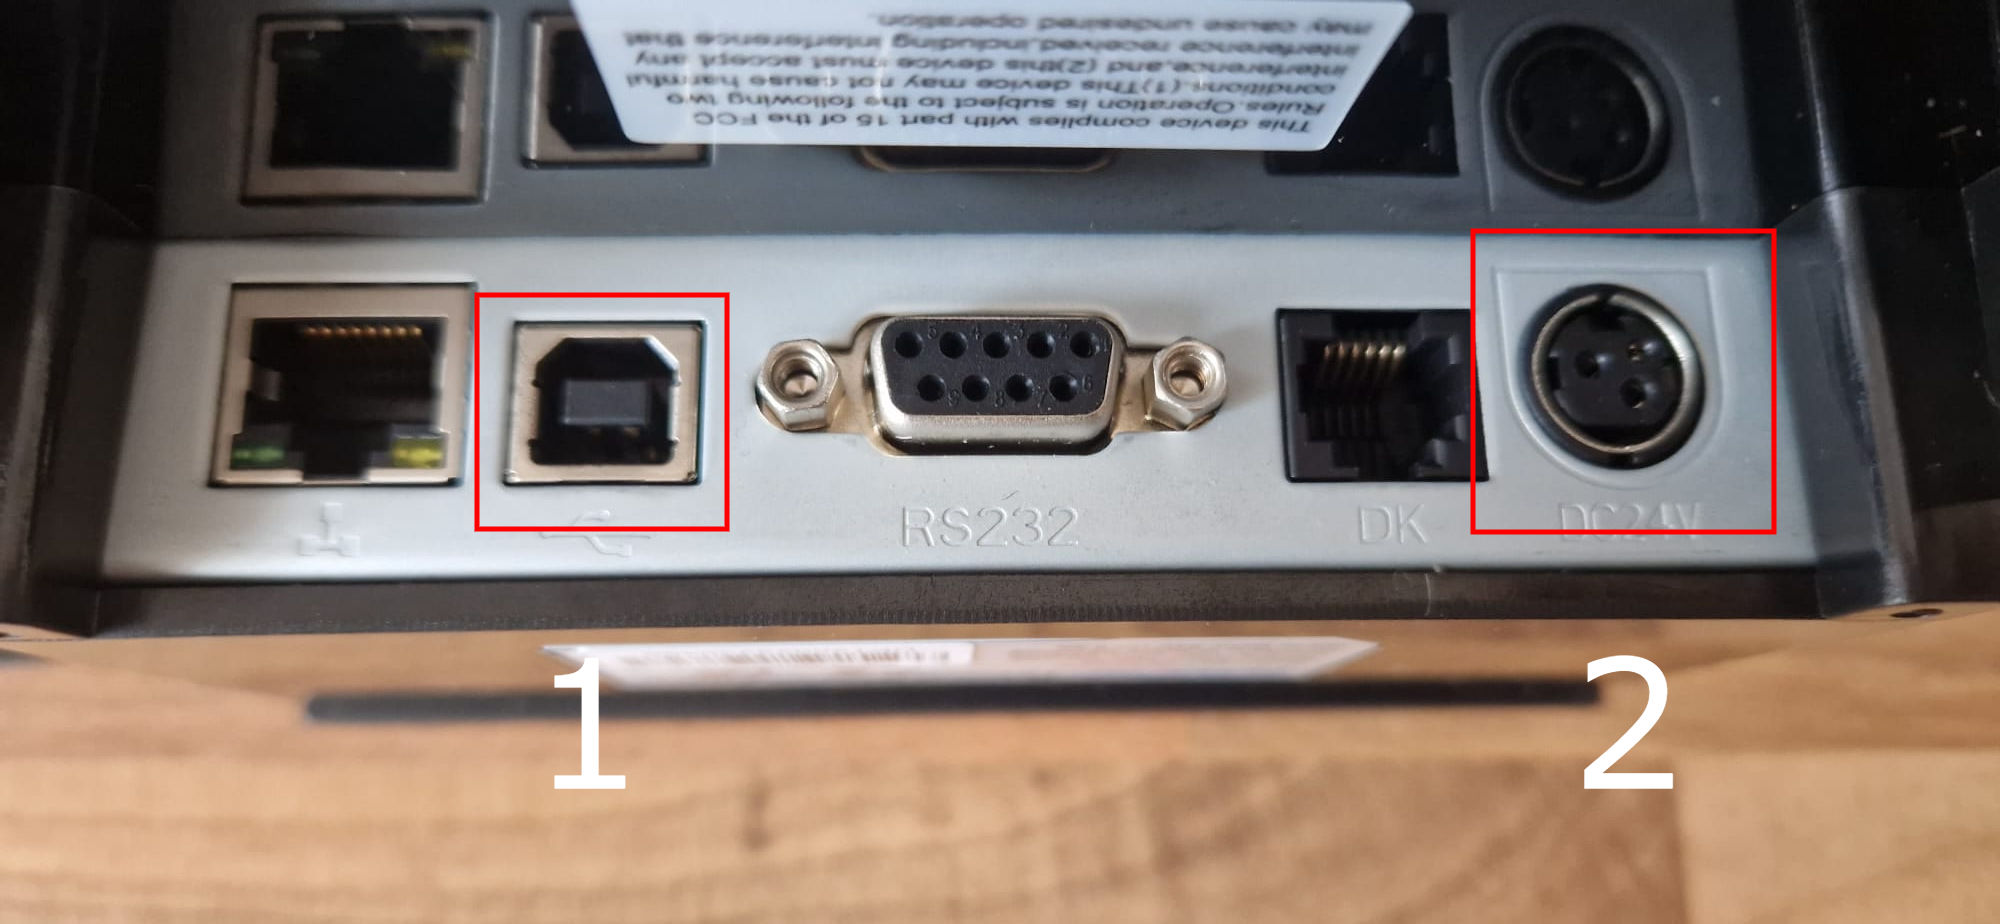
- Plug the USB-A to USB-B cable into the correct port.
- Connect the power adapter to the DC 24V port.
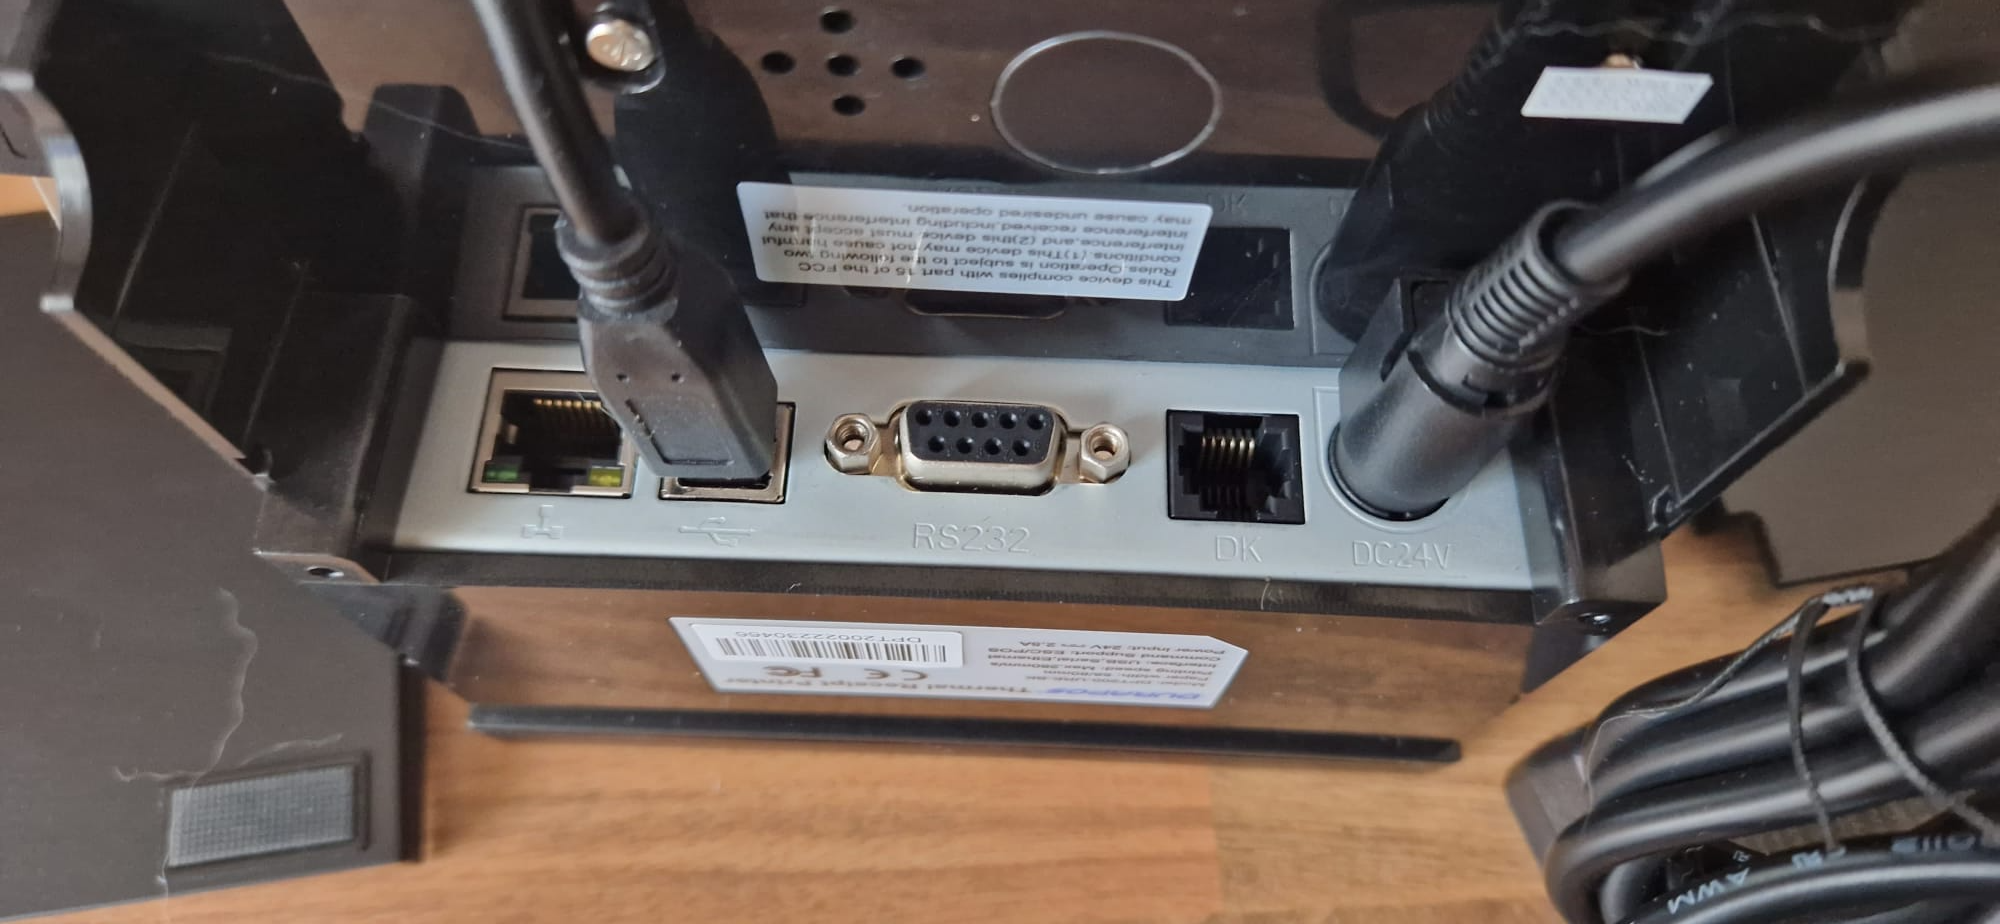
- Connect the other end of the USB cable to your tablet or PC, and pair the printer in the app via Settings and Verbind USB printer (Connect USB printer).
My USB printer no longer connects to the order app
Did your printer lose its connection? First remove the old pairing in Google Chrome:
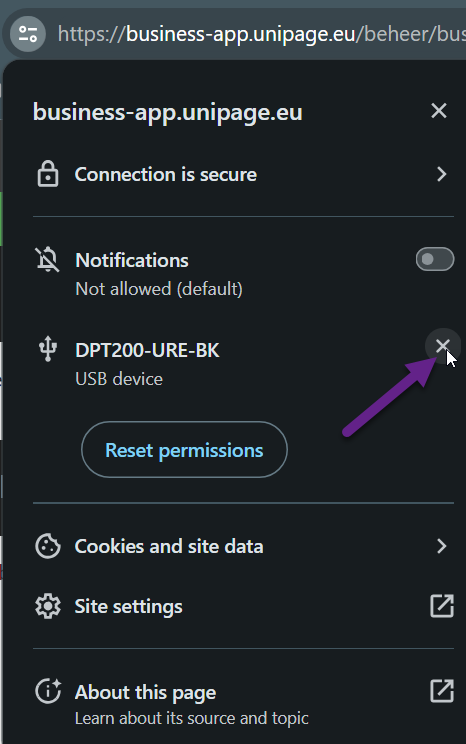
- To the left of the address bar, click the site information icon: two dots with lines, sometimes a padlock.
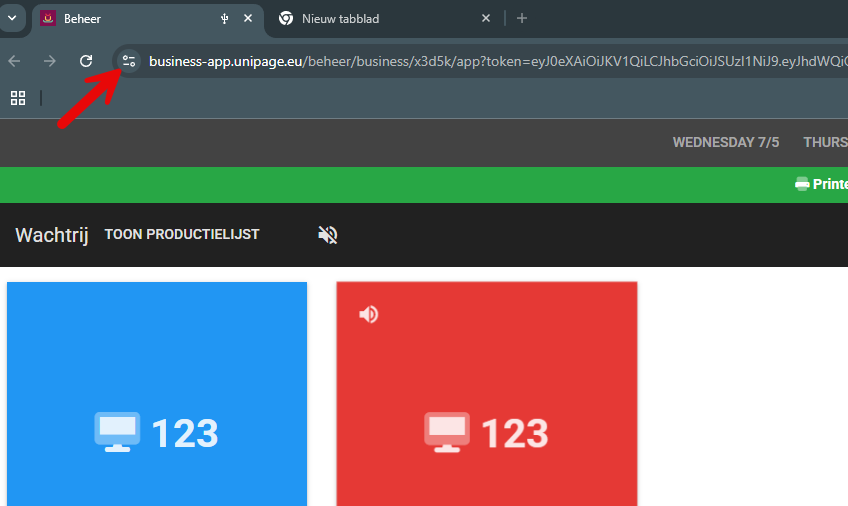
- Click the cross next to the printer you want to remove.
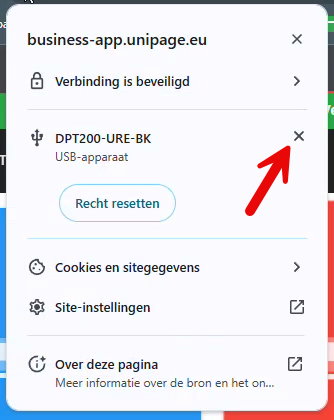
- Chrome asks you to reload the page: click Reload (Opnieuw laden).
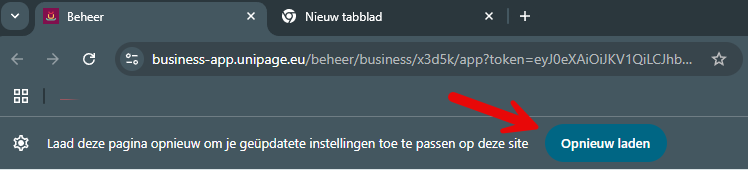
Then connect again: in the app, click Settings, choose Verbind USB printer, select your printer and click OK. If Chrome still asks for permission, click OK there too. Test straight away by opening a receipt and clicking Print ticket.
The printer no longer prints receipts
First check the basics: is the printer switched on, is it connected to your device, and is there still enough thermal paper in it?
If that doesn't help, remove the printer in the software and connect it again:
- Next to the address bar, click the site settings (the dots or the padlock).

- Click the cross next to the printer, for example dpt200, epson, star or printer 80. Do this for all devices in the list, or choose Delete permissions (Reset permissions). Confirm if Chrome asks you to.
- Refresh the page and press the Unipage logo.

- Go to Settings and check that Enable printer (Schakel printer in) is ticked.
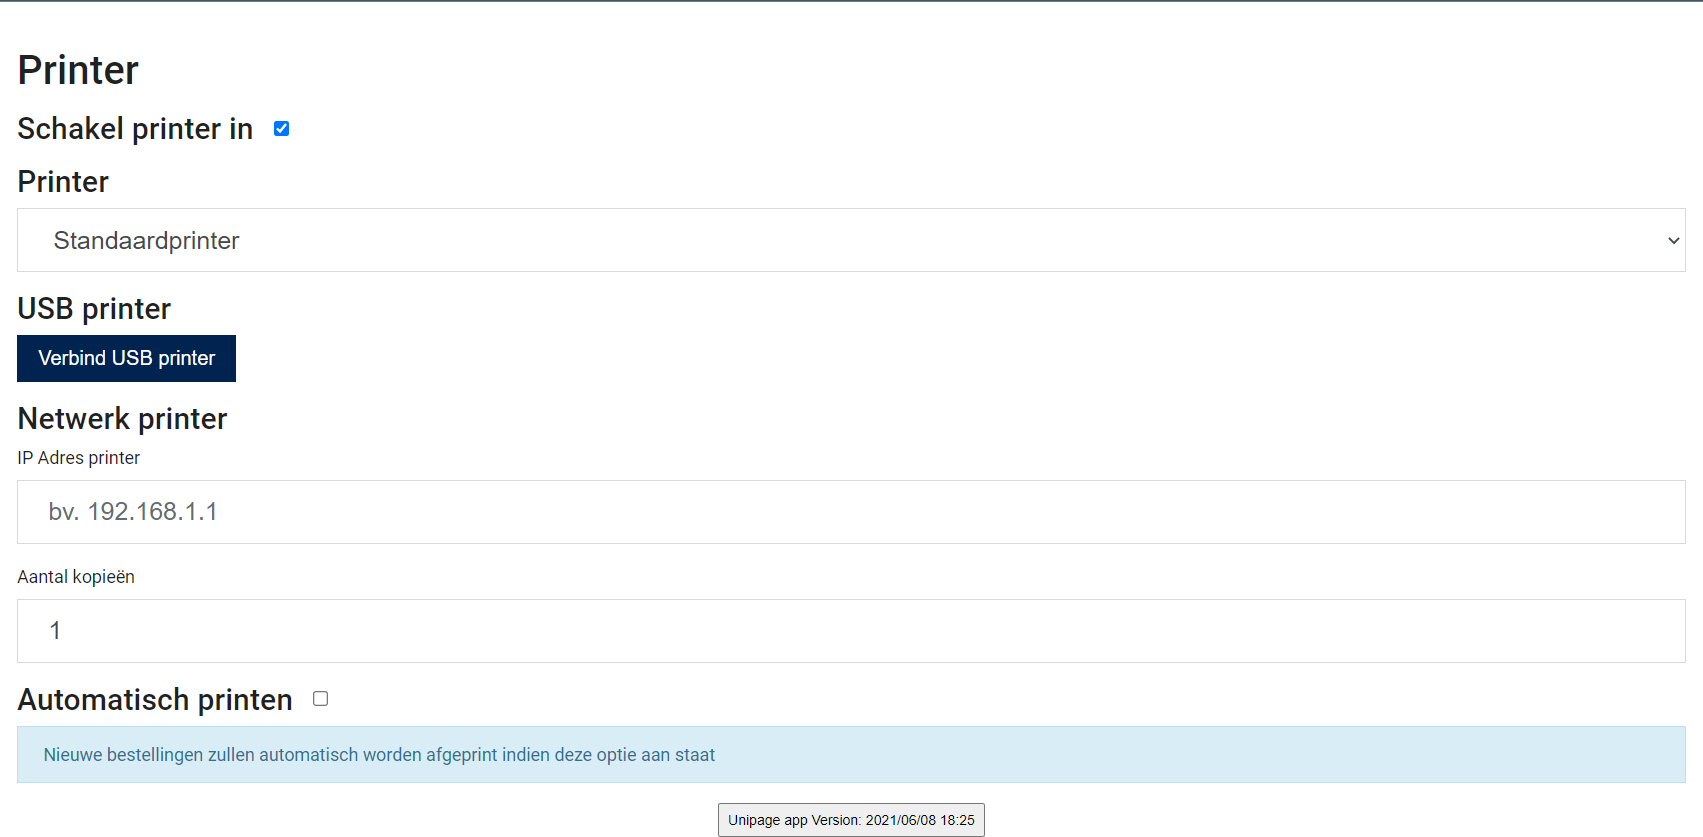
- Click Connect USB printer (Verbind USB printer) and select the printer you want to connect, for example printer 80, TM-m30II or DPT200.
Still not working? Try turning the USB-C hub around: that sometimes turns out to be the cause too.
Resetting an Epson TM-m30
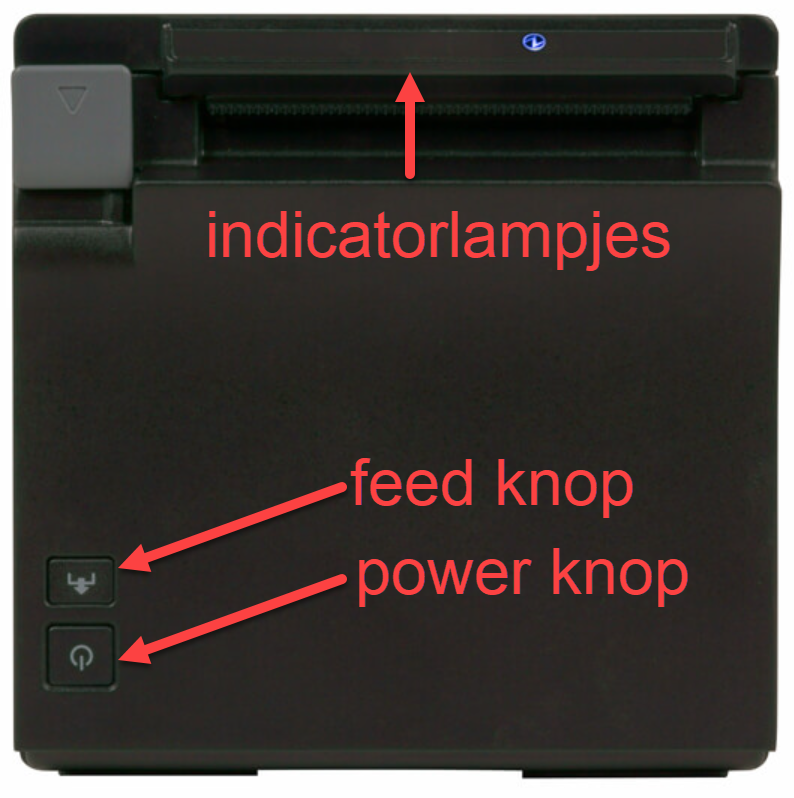
- Switch the printer off. If the indicator light is still on, press the power button once. Also check that there is paper in the printer.
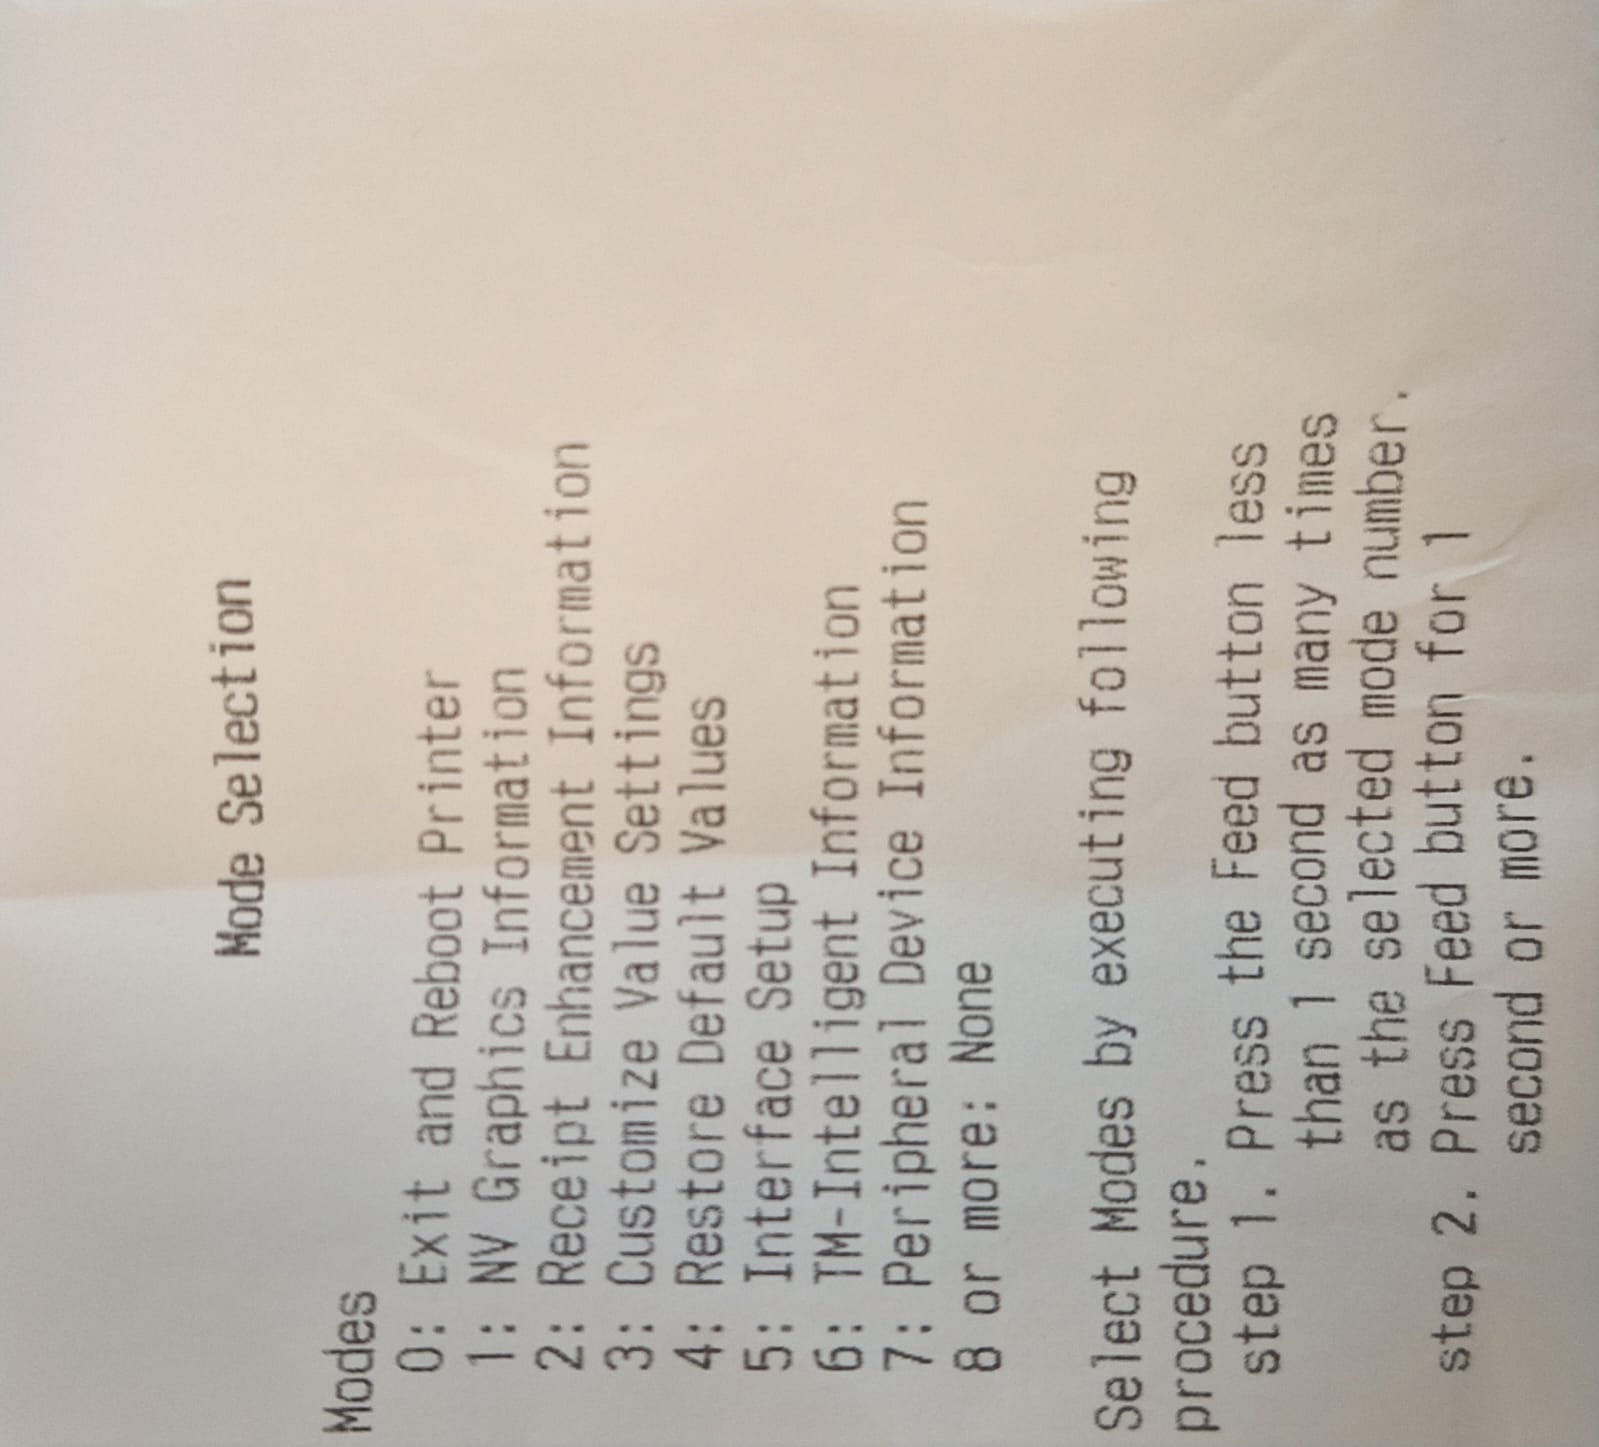
- Hold down the feed button and switch the printer back on: it starts in edit mode and prints a first slip. Then release the feed button.
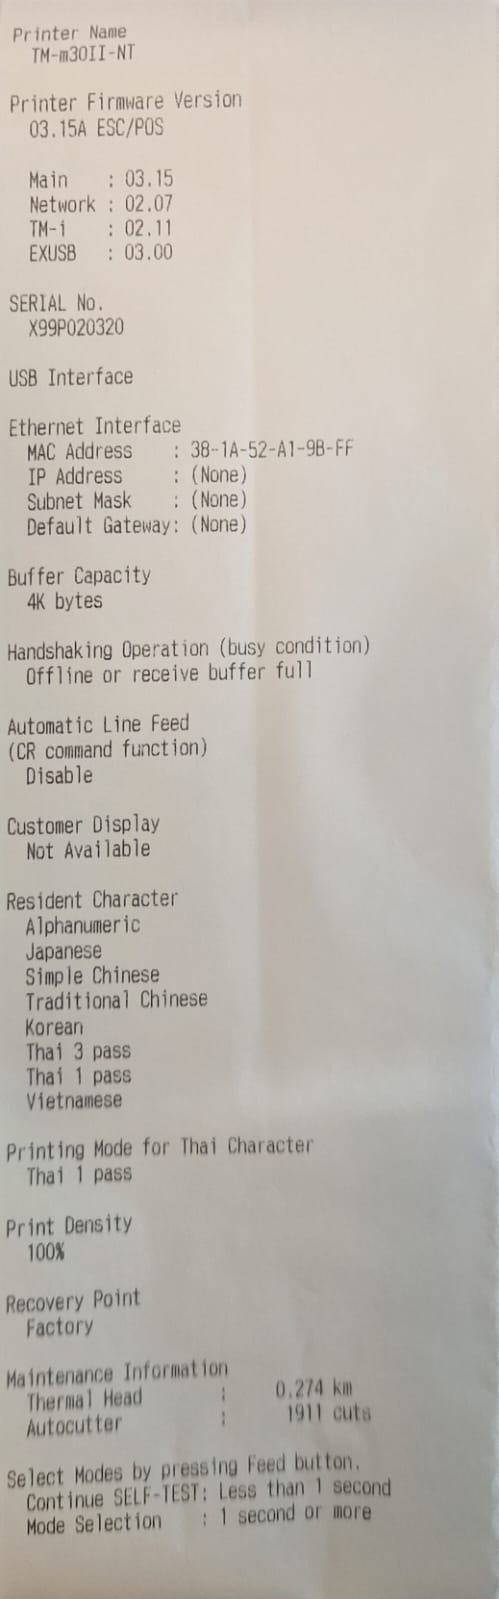
- Press the feed button once for a long time, at least 2 seconds. The printer prints this:
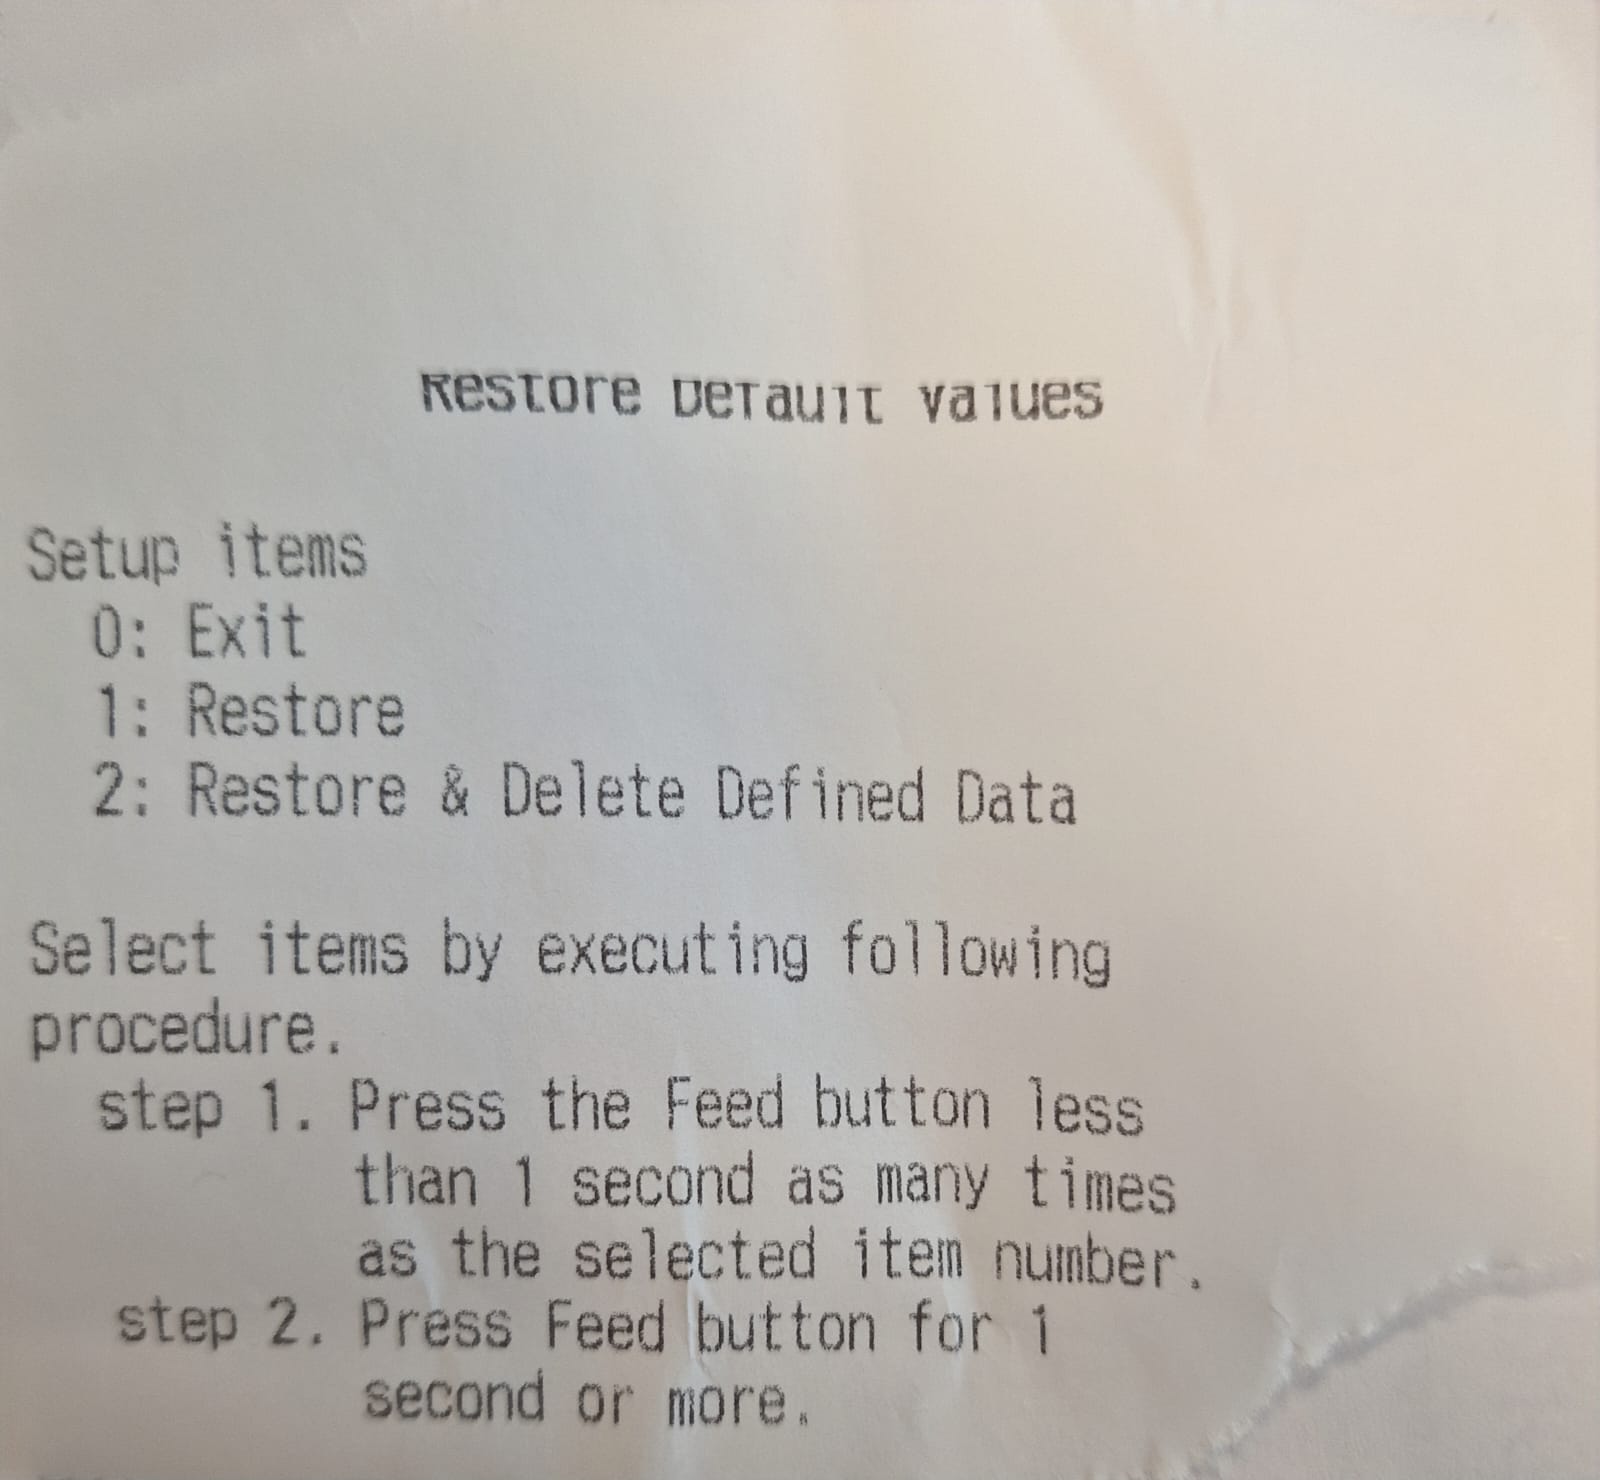
- Press four times briefly and then once for a long time. The printer prints this:
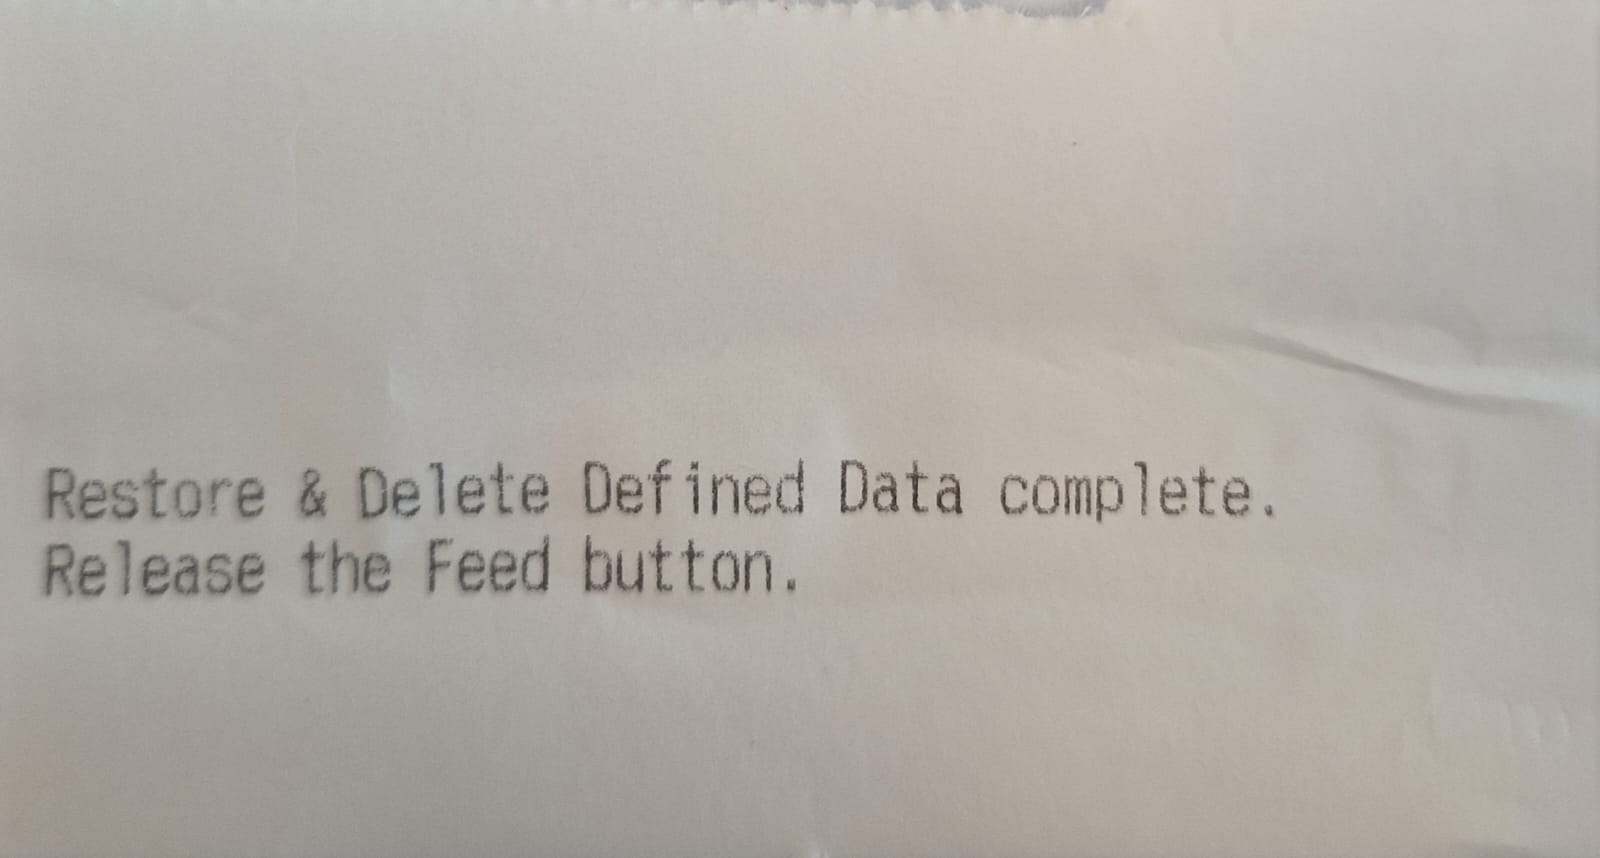
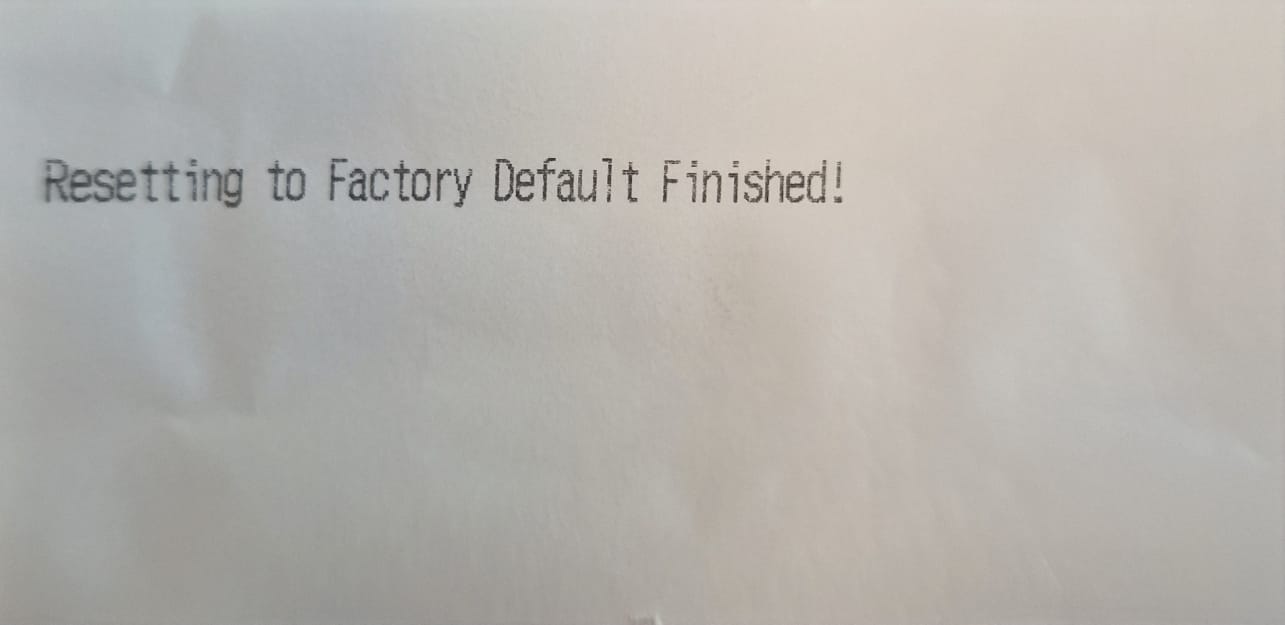
- Press twice briefly and then once for a long time. If the second option isn't listed, press once briefly. The printer now resets and prints these slips:
After the reset, the printer gets a new IP address. Go to Settings, Printer on the management page and check that the IP address (host) is still correct. Change it if needed.
Setting up a new Samsung tablet for the ordering app
Go through the tablet's setup wizard like this:
- Choose Dutch (Belgium) (Nederlands (België)) as the language and connect to your wifi. If the tablet has a SIM card, insert it now.
- Skip copying a backup and signing in with a Google account. You don't need a Samsung account or a PIN code either. Do allow location access and choose Google as the search engine.
- On the home screen: go to Settings, Apps, Default apps and choose Chrome as the browser (by default this is Samsung Internet).
- Set Settings, Display, Screen timeout to 30 minutes and make sure the screen stays on while charging (see the question below).
- Open Chrome, decline notifications and an account, go to beheer.unipage.eu, log in and open the ordering app. Then connect your printer via Settings and Connect USB printer.
Place the tablet on its charger: the ordering app needs to stay on all day.
How do I keep my Samsung tablet's screen on all the time?
This keeps the screen on as long as the tablet is on the charger:
- Go to Settings and scroll all the way down to About tablet.
- Tap Software information and tap Build number seven times, until the tablet says developer options are active. Enter your PIN code if the tablet asks for it.
- Go back to Settings: at the bottom you now see Developer options. Switch on Stay awake there (the screen never turns off while charging).
Also set Display, Screen timeout to 30 minutes, so the screen doesn't switch off straight away when the tablet isn't charging.
How do I reset my tablet to factory settings?
A reset wipes everything on the tablet: accounts, passwords and photos. Only do this if the tablet has become unusable, for example because of a forgotten passcode.
- Samsung tablet: follow Samsung's steps on samsung.com.
- Chrome OS tablet (Lenovo): on the sign-in screen, tap the password field so the keyboard appears, and press Ctrl, Alt, Shift and R at the same time. Confirm the Powerwash. The tablet wipes everything and restarts.
After that, you create a new account on the tablet again, open Chrome, log in at beheer.unipage.eu, open the ordering app and connect the printer again via Settings and Connect USB printer.