With the reservation module, you manage your dining room, your tables and your reservations in one place. Customers book online via your reservation page or via a widget on your own website, automatically receive a confirmation and a reminder, and you see every reservation appear on the table plan. The module builds on the table plan that you also use on the POS.
Good to know
You find Reservations (Reservaties) in the navigation bar of your management page. The module has its own sidebar: Reservations, Areas, Receipts, Shifts, Exceptions, Analytics and Settings.
What do you need?#
Availability is always calculated based on three things: your tables, your shifts and your exceptions. So set these up properly first.
Tables: under Areas (Gebieden) you draw your dining room. For each table, you set Min guests and Max guests, and you can link a table QR code. If you are temporarily not using an area, for example the terrace in winter, you close it with Close for reservations (Sluiten voor reservaties): those tables then do not count. You can read how to draw the table plan in Managing the table plan.
Shifts: when customers can book, for example Lunch and Dinner.
Exceptions: the days when you are closed.
Shifts#
Go to Shifts. You see a weekly calendar. Drag over an empty slot to create a shift, or click an existing shift to edit it. You can also drag a shift or make it longer by pulling its edge.
For each shift, you set:
Title, for example "Lunch", "Dinner" or "Sunday Brunch".
Minimum group size and Maximum group size: how many people one reservation may include. If you prefer to handle groups above a certain number by phone, set the maximum lower.
Repeat: no repeat, every day, every week, every month or every year. With Weekdays only and Months only you limit the repetition, for example a brunch on Sundays only, or a terrace shift only from May to September.
Start and End: the start and end time, and from and until when the series runs.
If you delete a recurring shift, the management page asks what exactly you want: This occurrence only (closes the shift only on that day), This and all future occurrences (ends the series from that day) or Delete entire series.
Exceptions#
You set closing days, holidays or a private event under Exceptions. Click Add exception, choose a Date, and under Shift choose whether you close the Whole business or just one shift (for example only lunch). Optionally add a Reason; with the quick options Christmas, New Year, Private event and Renovation, this takes one click. On that date, customers can no longer book online for the closed shifts.
Settings#
Under Settings in the sidebar of the reservation module, you find four tabs.
General#
Default seating time: how long a table stays occupied per reservation, 90 minutes by default. This also determines when a table becomes available again in the availability.
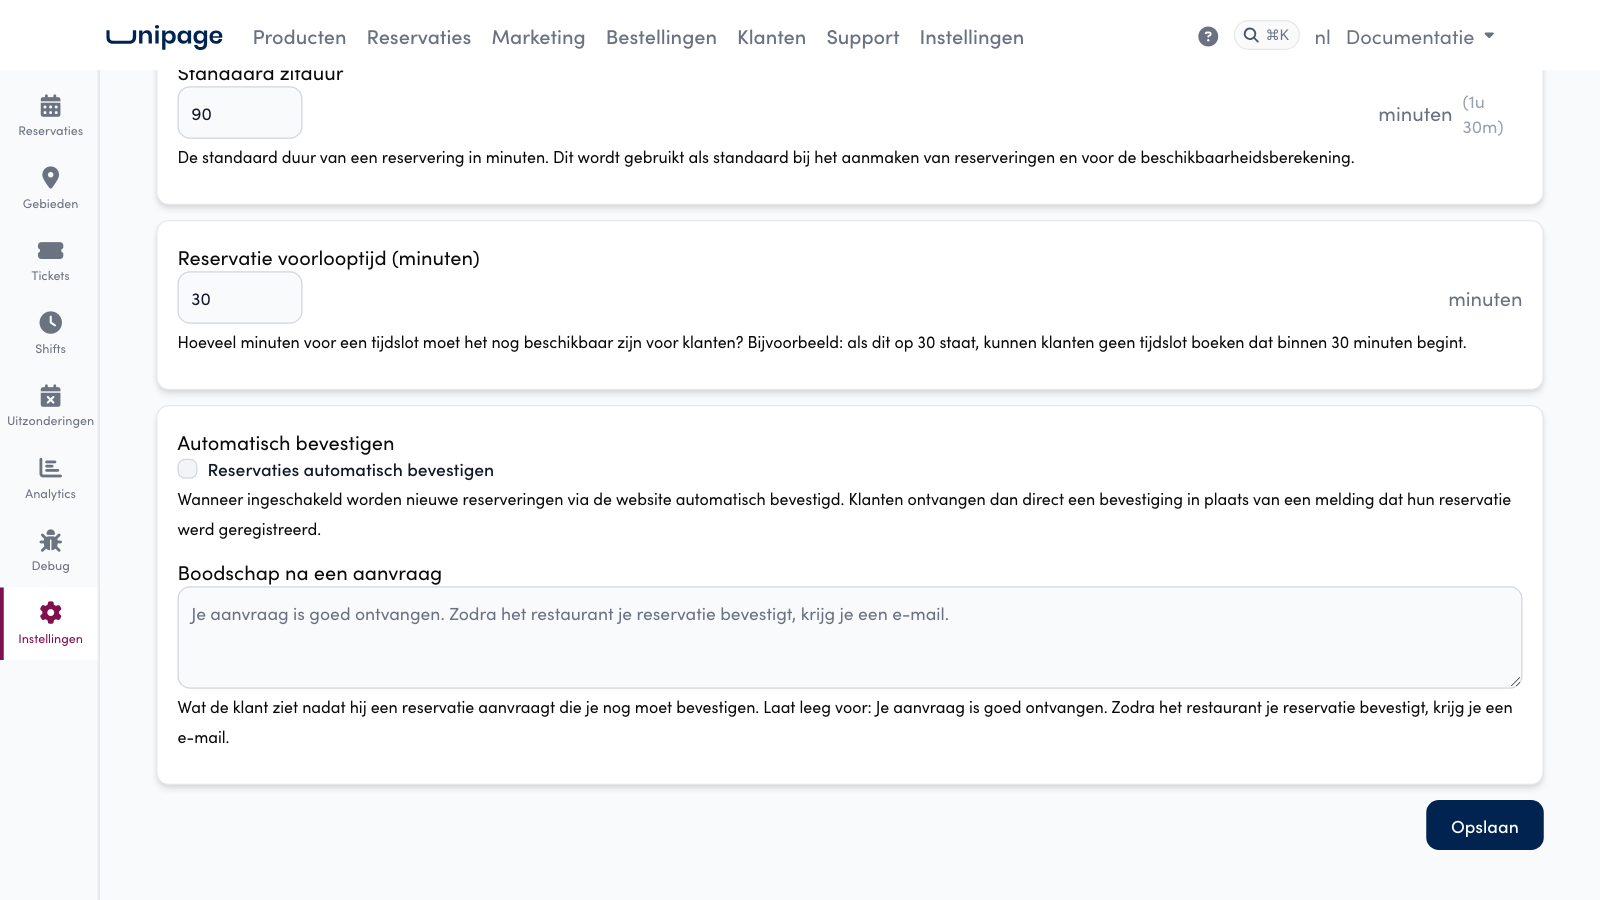
Reservation lead time: how many minutes in advance a time slot can still be booked, 30 by default. This way you don't receive a reservation for a table that starts in five minutes.
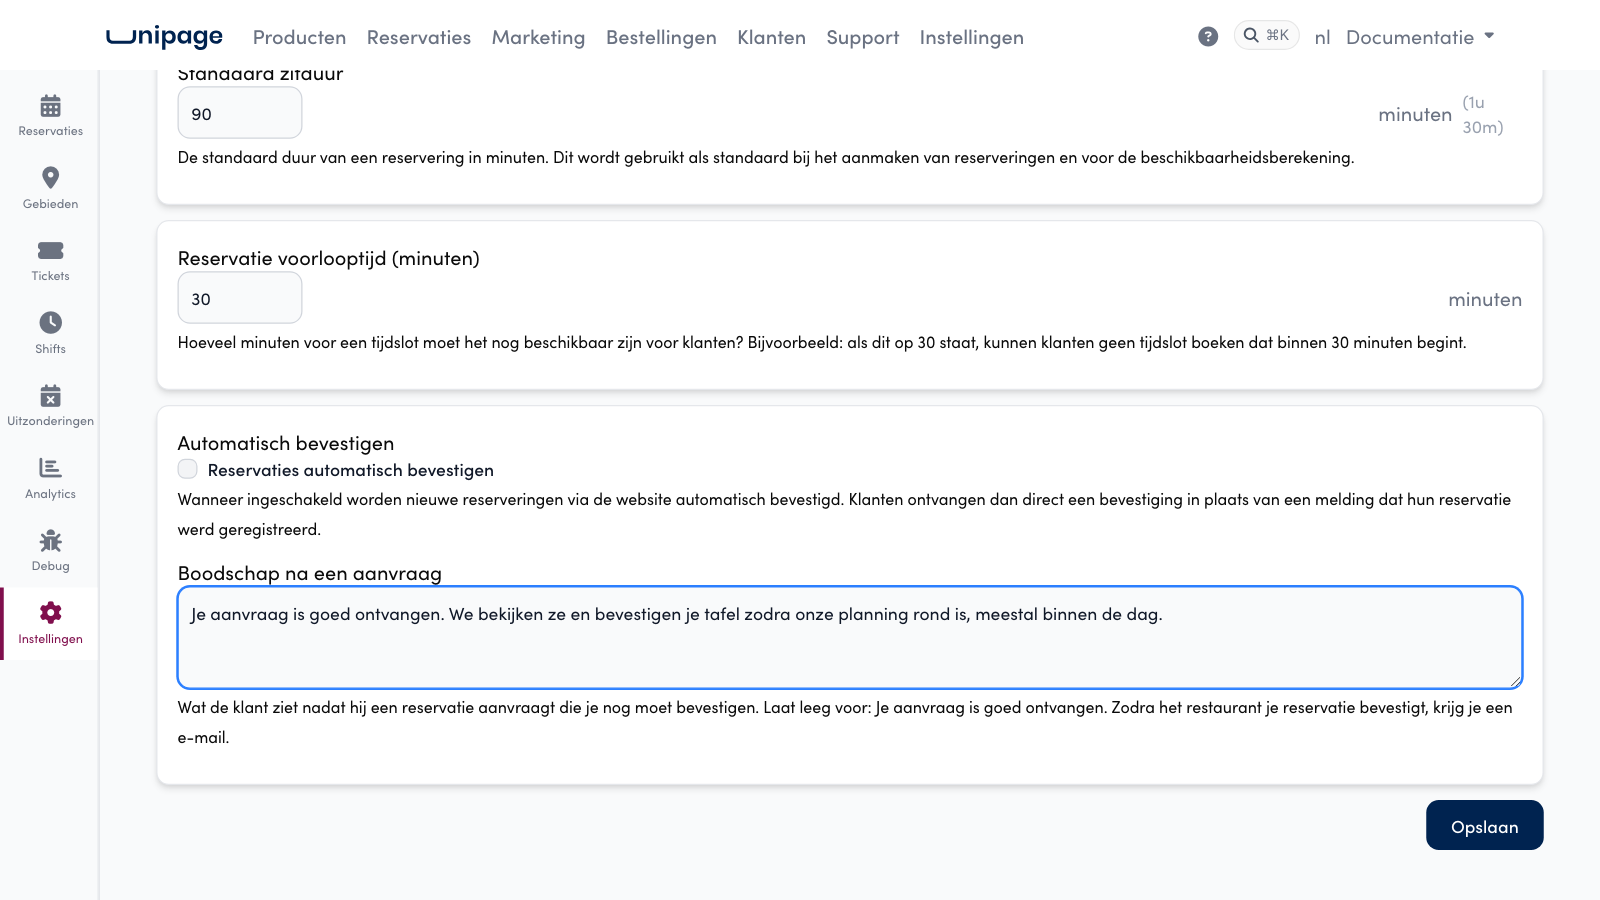
Confirm reservations automatically: if this is on, every online reservation is confirmed immediately and the customer receives a confirmation straight away. If it is off, the reservation comes in as Pending, the customer sees Reservation requested with the text from the field Boodschap na een aanvraag (that field only appears when this option is off), and you confirm or decline the request yourself.
Questionnaire#
Do you want to ask something extra when booking, such as a menu choice or dietary requests? Click Add question. For each question, you choose a type (Text, Long text, Number or Dropdown list) and whether it is Required. By default, one question is set up: "Comments", with the hint "For example: a table by the window please". You see the answers in the reservation details and in the confirmation e-mails.
Reminders#
Reminders are on by default and are sent by e-mail, by default 24 hours and 2 hours before the reservation. You can set up to four times with Add time. If you have the SMS feature on your account, you can also enable SMS reminders. If you change the time of a reservation, the reminders shift automatically; if you cancel it, they lapse.
No-show#
With No-show grace period you set after how many minutes a guest who has not turned up is automatically marked as a no-show, 30 minutes by default. Every quarter of an hour, the system checks the reservations that are Pending or Confirmed and whose time plus the grace period has passed, and sets them to No-show. The table then becomes free again.
How does your customer book?#
Customers can book online in two ways:
Via your reservation page: your webshop address followed by `/reservation`. The QR code that you create under Settings, Flyer also points to this page, see Promote your webshop.
Via a widget on your own website: under Settings, API in the management page, you find a piece of code under "Reservation Module" that you (or your web developer) paste on your website. The widget then appears as a "Reserveer" button.
The customer chooses the number of people, a date and an available time slot, fills in their name, e-mail address and phone number, and answers any questions you have set. If Confirm reservations automatically is on, they immediately receive a confirmation e-mail (and an SMS if you have the SMS feature) with the date, the time and the number of people. If it is off, they read Reservation requested and receive an e-mail saying their request has been registered; the confirmation follows as soon as you confirm the request. At the same moment, you receive a "New reservation" e-mail with all the details.
Good to know
A customer cannot cancel their reservation online themselves. If they phone or e-mail to cancel, you do that in the reservation details with Cancelling (Annuleren).
Following up reservations#
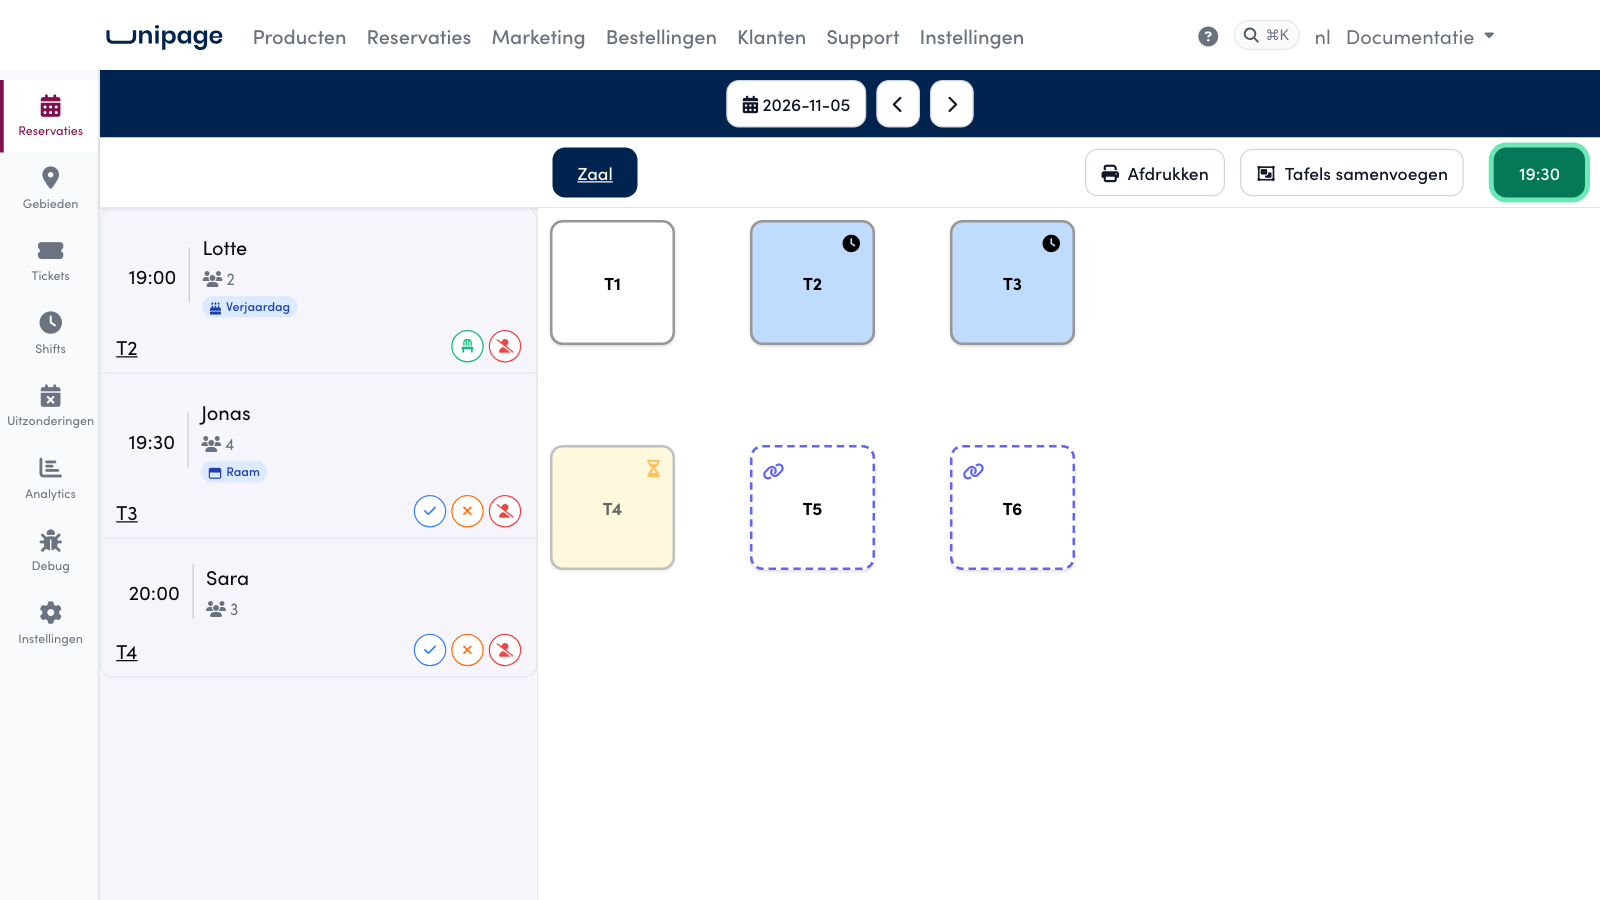
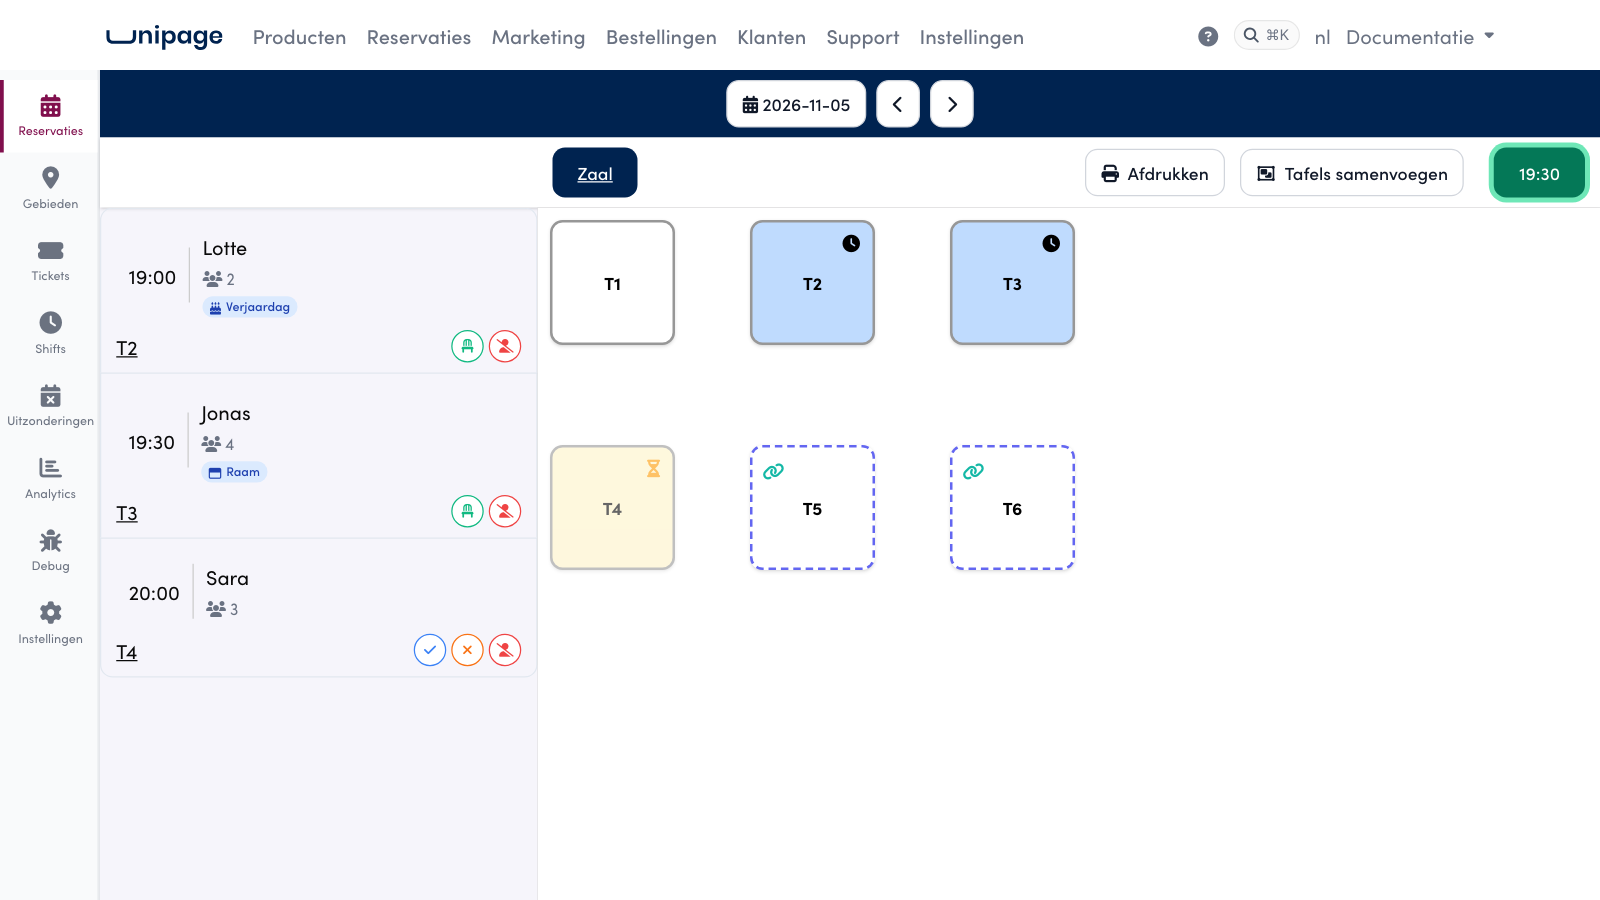
Reservations opens on the Table plan (Tafelplan) of today by default. With the date button and the arrows at the top, you jump to another day. On the left, you see all reservations for that day: time, name, number of people, shift and table. On the right, you see the table plan, where the occupied tables at the chosen time are coloured. With the List button you switch to a table with all details, and with Print you print the day's reservation list, handy at the reception.
Click a reservation to open the details. There are three tabs:
Details: the contact details, the time, the number of guests, the table, the customer's comments and your Internal notes (staff only). Here you adjust the reservation with Change or cancel it.
Contact: send the customer an e-mail directly from the management page, and see what was sent earlier.
History: all previous reservations of this customer, with the number of cancellations and their earlier notes.
Statuses#
A reservation goes through these statuses. With the buttons in the list or in the details, you move it one step further yourself.
Pending: came in online, not yet confirmed. Click Confirm or Weigeren (decline).
Confirmed: the customer has received a confirmation. On arrival, you click Seated.
Seated: the guests are at the table. After they leave, you click Completed.
Completed: the table is free again.
No-show: the guest did not turn up, manually or automatically after the grace period.
Cancelled: cancelled by you. By accident? With Restore you put it back.
Geweigerd (declined): a request you declined, as full or with your own reason. The table becomes free again; the guest receives an e-mail if you ticked it.
Tags#
For each reservation, you can set Tags that your customer gave or that you add yourself: Birthday, Anniversary, Business, Wheelchair, High chair, Dietary requests, Quiet table and Window. In addition, there are Internal tags that the customer never sees: VIP, Problematic, First time, Regular customer and Severe allergy. They appear as a badge in the list, so your team sees at a glance what is going on.
Confirming or declining a reservation request#
If Confirm reservations automatically (Reservaties automatisch bevestigen) is off, your guest does not book a table but requests one. The request comes in as Pending and already holds a suitable table, so the time slot does not go to someone else in the meantime. You answer it with Confirm or Weigeren (decline): with the buttons in the list next to the table plan, in the list view, in the window of a table or in the details panel of the reservation.
What your guest reads after the request#
After sending, your guest sees Reservation requested, with your message, the reference and the date underneath. They also receive an e-mail saying their reservation has been registered (and an SMS if you have the SMS feature). You set the message on the page under Reservations > Settings > General, in the field Boodschap na een aanvraag (message after a request) under Automatisch bevestigen. The field only appears when automatic confirmation is off, and the text (500 characters at most) appears exactly as you type it, in every language. If you leave it empty, the guest reads: "We have received your request. As soon as the restaurant confirms your reservation, you will receive an e-mail."

Confirming a request#
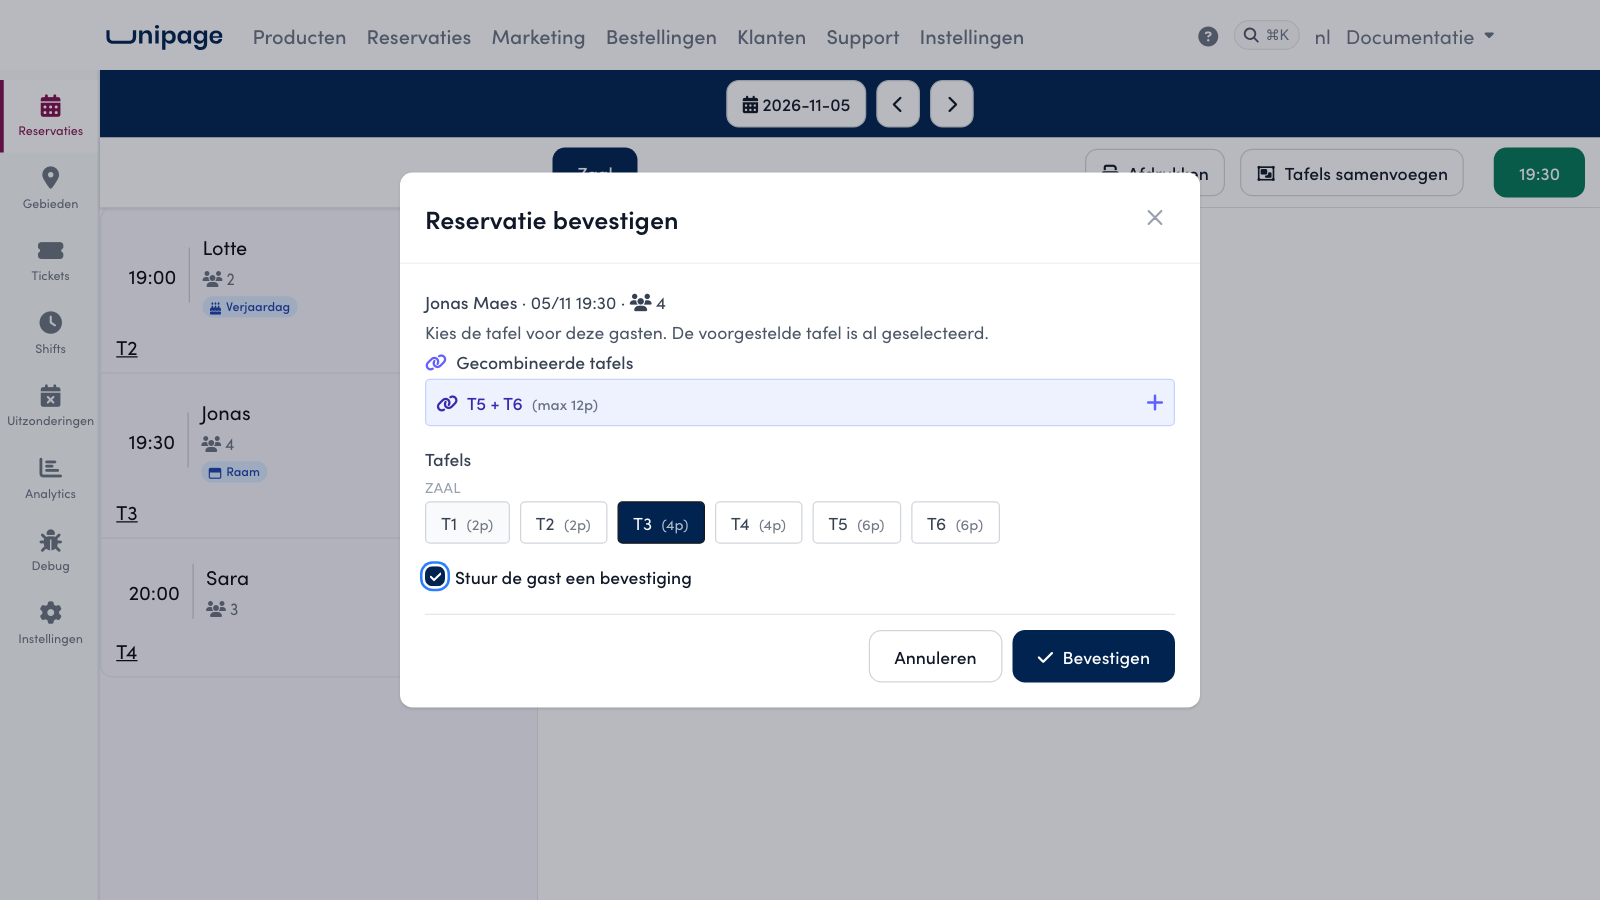
Click the blue check Confirm in the reservation's row. The Reservatie bevestigen window shows the tables of your dining room; the suggested table is already selected. Click another table (several tables together also works) or choose a group under Gecombineerde tafels (combined tables). If the guest gave an e-mail address, Stuur de gast een bevestiging (send the guest a confirmation) is ticked: they receive the confirmation e-mail (and an SMS if you have the SMS feature). Click Confirm. The reservation is now Confirmed.
Declining a request#
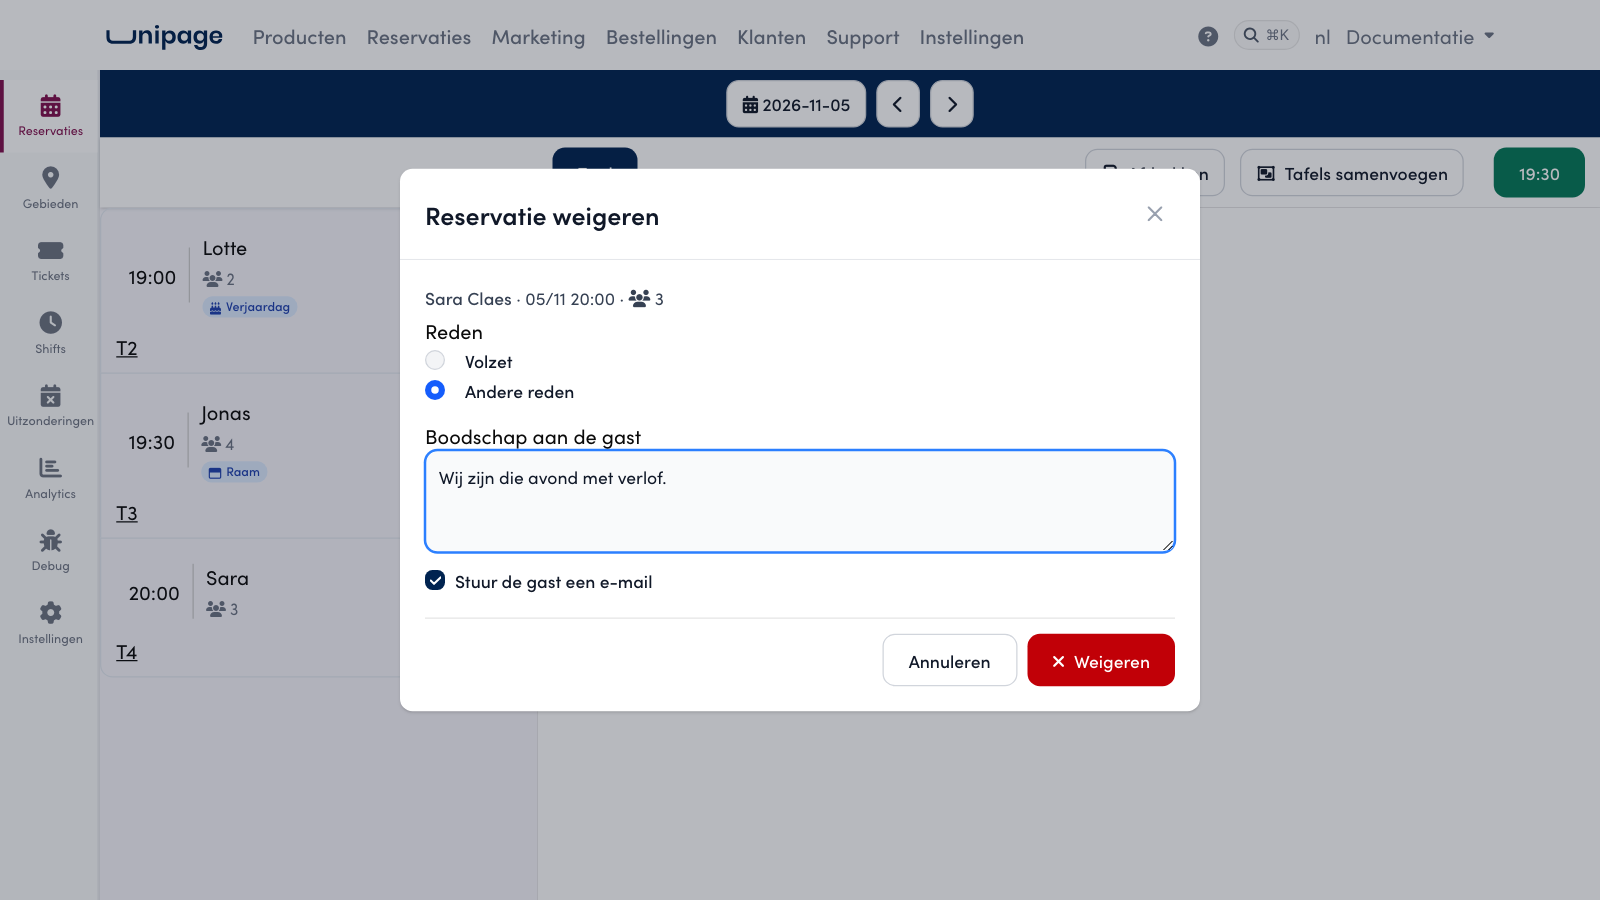
Click the orange cross Weigeren. In Reservatie weigeren, choose a Reden (reason): full or Andere reden (other reason). With Andere reden, type under Boodschap aan de gast what the guest will read, for example that you are on holiday that evening. With Stuur de gast een e-mail ticked, they receive an e-mail: "Unfortunately we cannot confirm your reservation at [your business] on [date].", followed by "We are fully booked at that time." or your message. Untick the box, for example because you already phoned them, and only the status changes. Click Weigeren.
The reservation is now Geweigerd (declined): the table becomes free again for other reservations, the reminders lapse, and in the Contact tab you read Geweigerd: volzet (declined: full) or your own message. In the list it is greyed out and in Analytics it counts as Geweigerd.
Warning
You answer a request only once: after Confirm or Weigeren, both buttons disappear, and a declined reservation cannot go back to Pending. If the guest turns up anyway, enter a reservation yourself via New reservation.
Entering a reservation yourself#
For a phone reservation or a guest at the door, click a free (green) table on the table plan and choose New reservation or Place walk-in. A table that is already reserved at that time is coloured differently and cannot be selected.
Fill in the date, the time, the number of guests and the Length of stay. With Search existing customer, you retrieve the details of a returning customer via name, e-mail or phone; otherwise, you fill them in yourself. Choose a Status (Not confirmed or Confirmed) and whether you want to send a Confirmation message. A walk-in is immediately set to Seated.
Tip
Always fill in an e-mail address and phone number. Without an e-mail address, the customer receives no confirmation or reminder.
Merge tables for large groups#
Is a group coming that does not fit at one table? Click Merge tables on the table plan. Give the group a Group name, tick at least two tables and choose the Type:
Permanent: the group is always available for large reservations, including online. Handy for a fixed long table.
Temporary: only for a specific reservation, for example a family party on Saturday.
By default, the capacity of the group is the sum of the tables. Under Advanced settings, you adjust this with the Guests modifier (for example -2 if two seats are lost by pushing the tables together) or with your own minimum and maximum. Merged tables get a link icon on the table plan. Under Existing groups, you delete a group again; the tables then become available separately again.
Tip
Put the number of people in the group name, for example "Long table middle: 16 people". This way your team immediately sees what is possible.
Limiting no-shows#
Empty tables cost revenue. Besides the automatic no-show detection, the module keeps track per customer (based on e-mail address or phone number) of how often they did not turn up. From two no-shows, the customer gets a red badge with the number in the reservation list, and in the details the warning "Warning: repeated no-shows". This way you decide yourself whether to confirm such a reservation, or to phone first.
Analytics#
Under Analytics, you choose a period and see the total number of reservations and guests, the no-show percentage, the average group size, and charts per day, per hour, per weekday and per table. With CSV Export, you take the figures to Excel. Handy for spotting busy moments and adjusting your shifts.
Frequently asked questions
My guest still saw 'Reservation confirmed!' after the request.
Then Confirm reservations automatically is on under Reservations > Settings > General. Turn it off and your guest reads Reservation requested; you then confirm or decline every request yourself.
Why does a request already have a table?
At the request, the system already holds a suitable table so the time slot does not go to someone else in the meantime. That table is a suggestion: you pick the final table when you confirm.
Can I restore a declined reservation?
No. Declining is final and the Confirm and Weigeren buttons disappear. If the guest turns up anyway, enter a new reservation yourself via New reservation, or the guest makes a new request.